作者: [email protected]
光猫桥接模式设置指南(如何设置光猫为桥接模式)
https://www.luyouqi.com/shezhi/3012.html
光猫设置桥接模式,是家庭网络的一个基础设置,也是一个比较重要的设置。
设置了光猫桥接模式后,拨号上网由路由器来进行,可以方便进行其他网络相关操作,而且可以减少因为光猫问题造成的网络性能瓶颈,家庭网络故障等。
个人建议在办理宽带业务后,先将光猫设置为桥接模式之后,再进行其他的网络设备的连接和调试。
修改光猫为桥接,需要有一些网络知识,如果自行修改错误,造成无法上网。需要联系宽带师傅上门处理。光猫在默认的网关模式下,运营商是可以远程控制光猫的,进行配置下发等操作,光猫桥接后,一些光猫的问题,运营商无法远程处理,需要安排工程师上门,无形中增加了工程师的上门工作量,所以有时候宽带师傅不一定愿意给出光猫的超级管理员密码。所以好好对待宽带师傅哦,尽量自己可以搞光猫的问题。
因为光猫的品牌型号不同,操作页面会有所差异,请参考操作思路,不要全部照搬。
光猫桥接模式的具体步骤如下:
获取光猫的超级管理员账号密码
获取光猫的拨号账号名称和密码
修改光猫的桥接模式
关闭光猫的DHCP服务
配置路由器拨号
1、获取光猫的超级管理员账号密码
这个步骤是最关键的一步
我使用的是电信宽带,光猫型号为:中兴的ZXHN F650A

光猫照片
光猫背后的管理员账号,是一个普通的用户,登录光猫后台后,能配置的功能非常有限。
这个普通账号的用户名是:useradmin

普通账号登录后,是无法修改光猫的桥接模式的。

普通用户的后台,无法配置桥接设置
我们首先需要获取到光猫的超级管理员账号和密码
以电信光猫为例,可以直接百度搜索,关键字:电信光猫 超级管理员
电信光猫的超级管理员账号:telecomadmin
超级管理员密码:nE7jA%5m
登录地址:http://192.168.1.1

如果找到的密码无法登录管理后台,可以与光猫的安装师傅或者宽带客服电话联系,索取超级管理员密码。这是最简单快速的方法。不同的光猫品牌,不同型号,不同省市的
淘宝上也有很多光猫相关的服务,实在搞不定的时候,也可以去看看。
2、获取光猫的拨号账号和密码
因为光猫的默认状态是路由模式,由光猫进行PPPOE的拨号,拨号的用户名和密码直接配置在光猫中,我们并不知道,这个账号和密码,需要配置到我们自己的路由器上,所以需要先获取这个账号和密码。
这个账号和密码,需要与宽带运营商联系,运营商会核对办理宽带的信息,然后重置密码,告知我们拨号的账号和密码。找个地方,牢记账号和密码
3、修改光猫为桥接模式
使用超级管理员登录光猫的管理界面。

登录后看到的光猫管理界面,此时可以配置光猫的全部功能了。

超级管理员登录后的光猫后台

需要注意的是“业务信息”中的“上网”,此处的连接名称为:2_INTERNET_R_VID_41
点击上方的“网络” > “网络设置”>“网络连接”

光猫默认的路由模式
连接名称中选择:2_INTERNET_R_VID_41
看到默认的连接模式是:路由,将连接模式从路由,修改为桥接。修改为桥接后,可以看到用户名和密码的输入框消失了。
修改为桥接后,界面如下,然后点击保存。

修改为桥接模式
4、关闭光猫的DHCP服务
连接光猫后,需要手工将光猫的DHCP服务关闭,避免网络中存在多个DHCP,引起网络异常。
关闭光猫的DHCP服务后,网络中的DHCP服务由路由器来承担。
依次点击,网络 > 用户侧管理 > IPV4设置 > 取消DHCP Server的勾选。然后保存。

关闭光猫的DHCP
5、使用路由器进行拨号
将路由器的WAN口与光猫的LAN口连接。一定是非IPTV的网口,连接的时候一定要看清楚。
登录路由器的管理后台。以小米路由器为例
设置WAN口的上网方式,改为PPPOE。如果是光猫拨号,这里的上网方式是DHCP。
然后输入宽带的账号和密码。保存即可。路由器进行拨号。

配置路由器拨号
关闭光猫的DHCP服务后,如何访问光猫的管理后台?
关闭光猫的DHCP服务之后,光猫的默认管理IP为:192.168.1.1(请以实际的光猫IP为准)
通常不需要再登录光猫后台进行操作。
如果需要操作,需要将网线连接到光猫的LAN口和管理的电脑上。注意不要连接到光猫的IPTV接口,这个接口是无法进入光猫后台的。
在电脑上手工配置一个与光猫同网段的静态IP地址,比如:192.168.1.2,子网掩码:255.255.255.0
不需要配置网关和DNS。
然后在浏览器中输入光猫的管理IP,即可登录光猫的管理后台。
如果路由器支持双WAN口,可以将光猫的LAN口再连接到路由器的另外一个WAN口,WAN口配置一个与光猫同网段的IP即可。这样可以随时通过路由器的无线网络,访问光猫的后台。
也可以将路由器的上网方式,改为静态IP,配置一个与光猫同网段的IP,比如192.178.1.2,子网掩码:255.255.255.0,DNS和网关都是192.168.1.1,然后保存配置,这个时候通常路由器会重启,路由器重启后,可以通过路由器的无线网络,访问到光猫的后台。但是这个时候是不能上网的。
获取公网IP
如果可以获取到公网IP,那么对于网络使用来说,是非常有利的,可以方便地进行内网的服务管理,比如进行端口映射等操作。有了公网IP可以大大增强网络的功能。
获取公网IP,需要与宽带的服务商进行联系,反馈说需要公网IP,家里需要设置监控等。
获取到的公网IP,会在路由器的后台显示。如上图显示,我的路由器拨号后,获取的IP是124开头,这就是公网IP地址。
公网IP地址资源有限,家庭用户的公网IP,通常会过一段时间就会变更。建议搭配DDNS使用,可以通过域名来访问自己家庭的内网。
公网IP指的是,除了私有IP网段之外的IP,私有IP网段如下:这些IP都是在内部使用,不能在Internet上使用的IP。
A: 10.0.0.0~10.255.255.255 即10.0.0.0/8
B:172.16.0.0~172.31.255.255即172.16.0.0/12
C:192.168.0.0~192.168.255.255 即192.168.0.0/16
wordpress去除评论、文章发布时间及日期
有时候我们并不希望暴露我们的发布时间和作者,更多的时候我们非常反感垃圾评论污染我们的网站,幸好wordpress提供了丰富的插件扩展,安装以下插件解决问题:
安装两个插件:
1、WP Meta and Date Remover
2、Disable Comments – Remove Comments & Stop Spam [Multi-Site Support]
3、有些情况下还需要在wordprss的小工具中删除评论区
利用家庭宽带对外提供服务
利用家里宽带提供对外服务,一般需要以下步骤
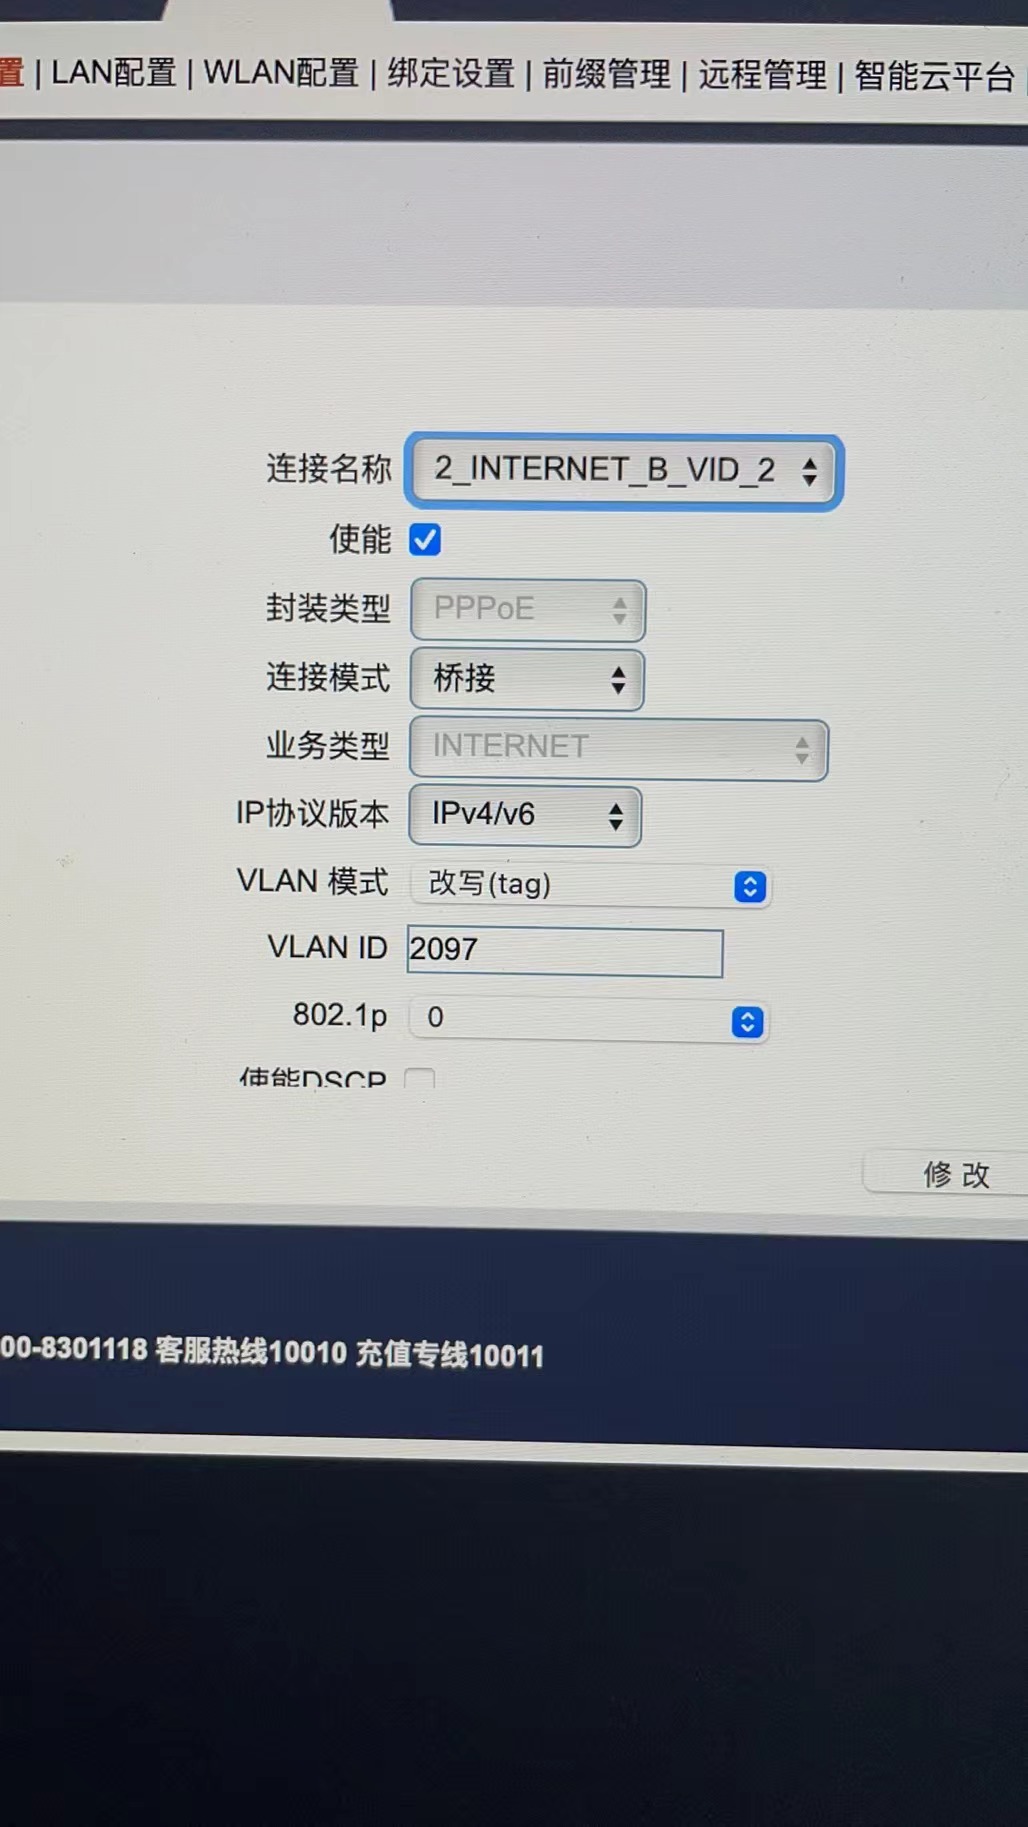
1、登陆光猫,并新建拨号pppoe方式,并设置为ipv4/ipv6方式,同时vlan模式设置为改写
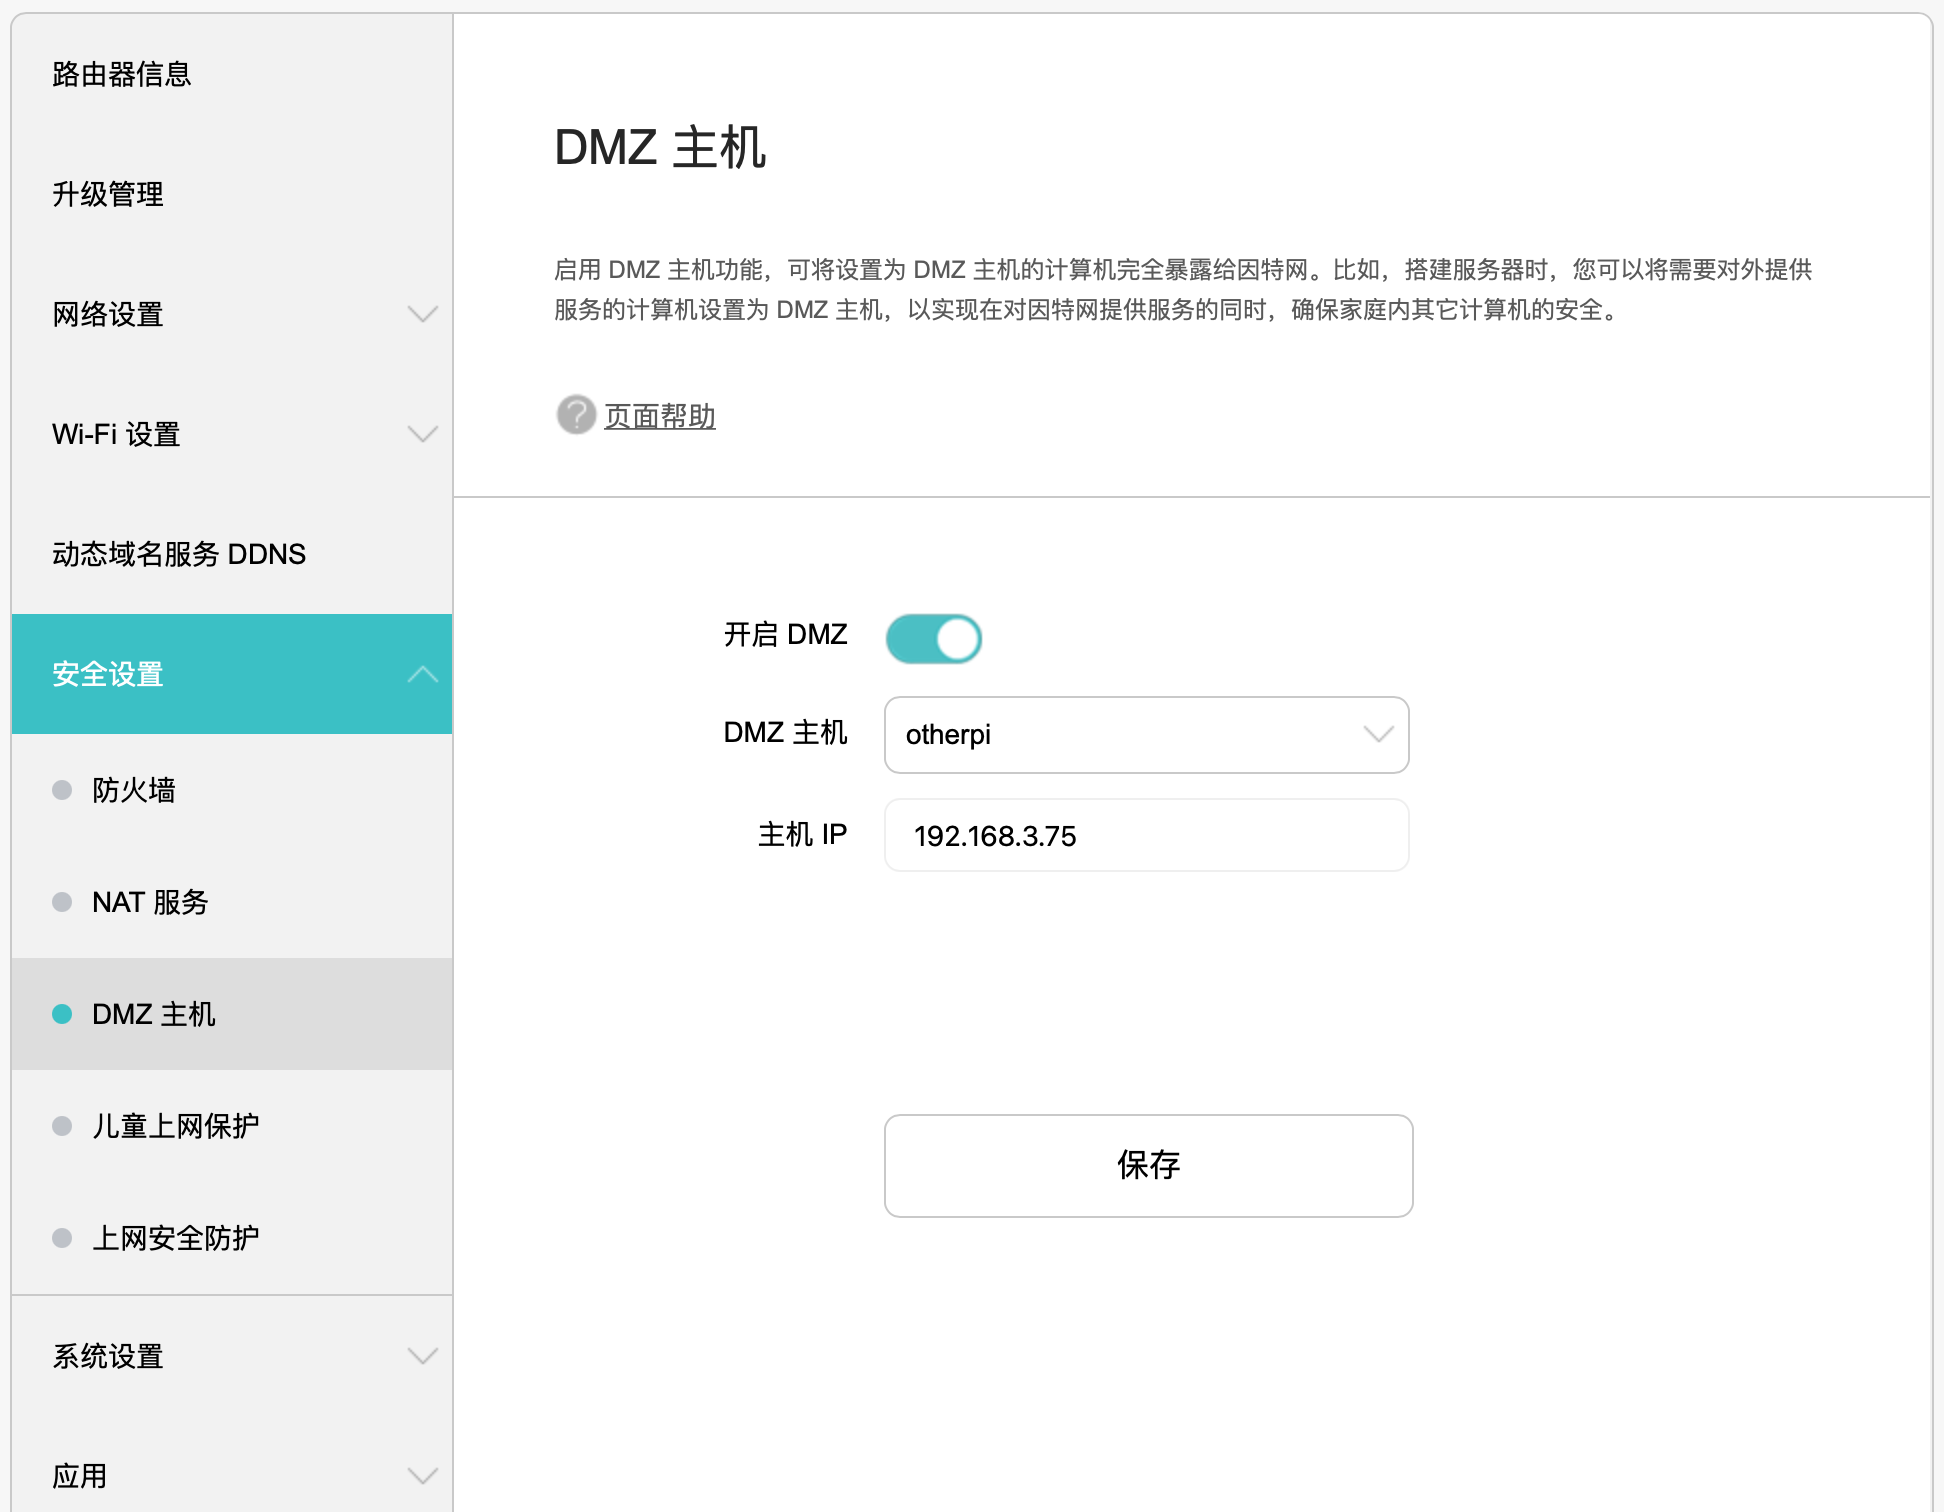
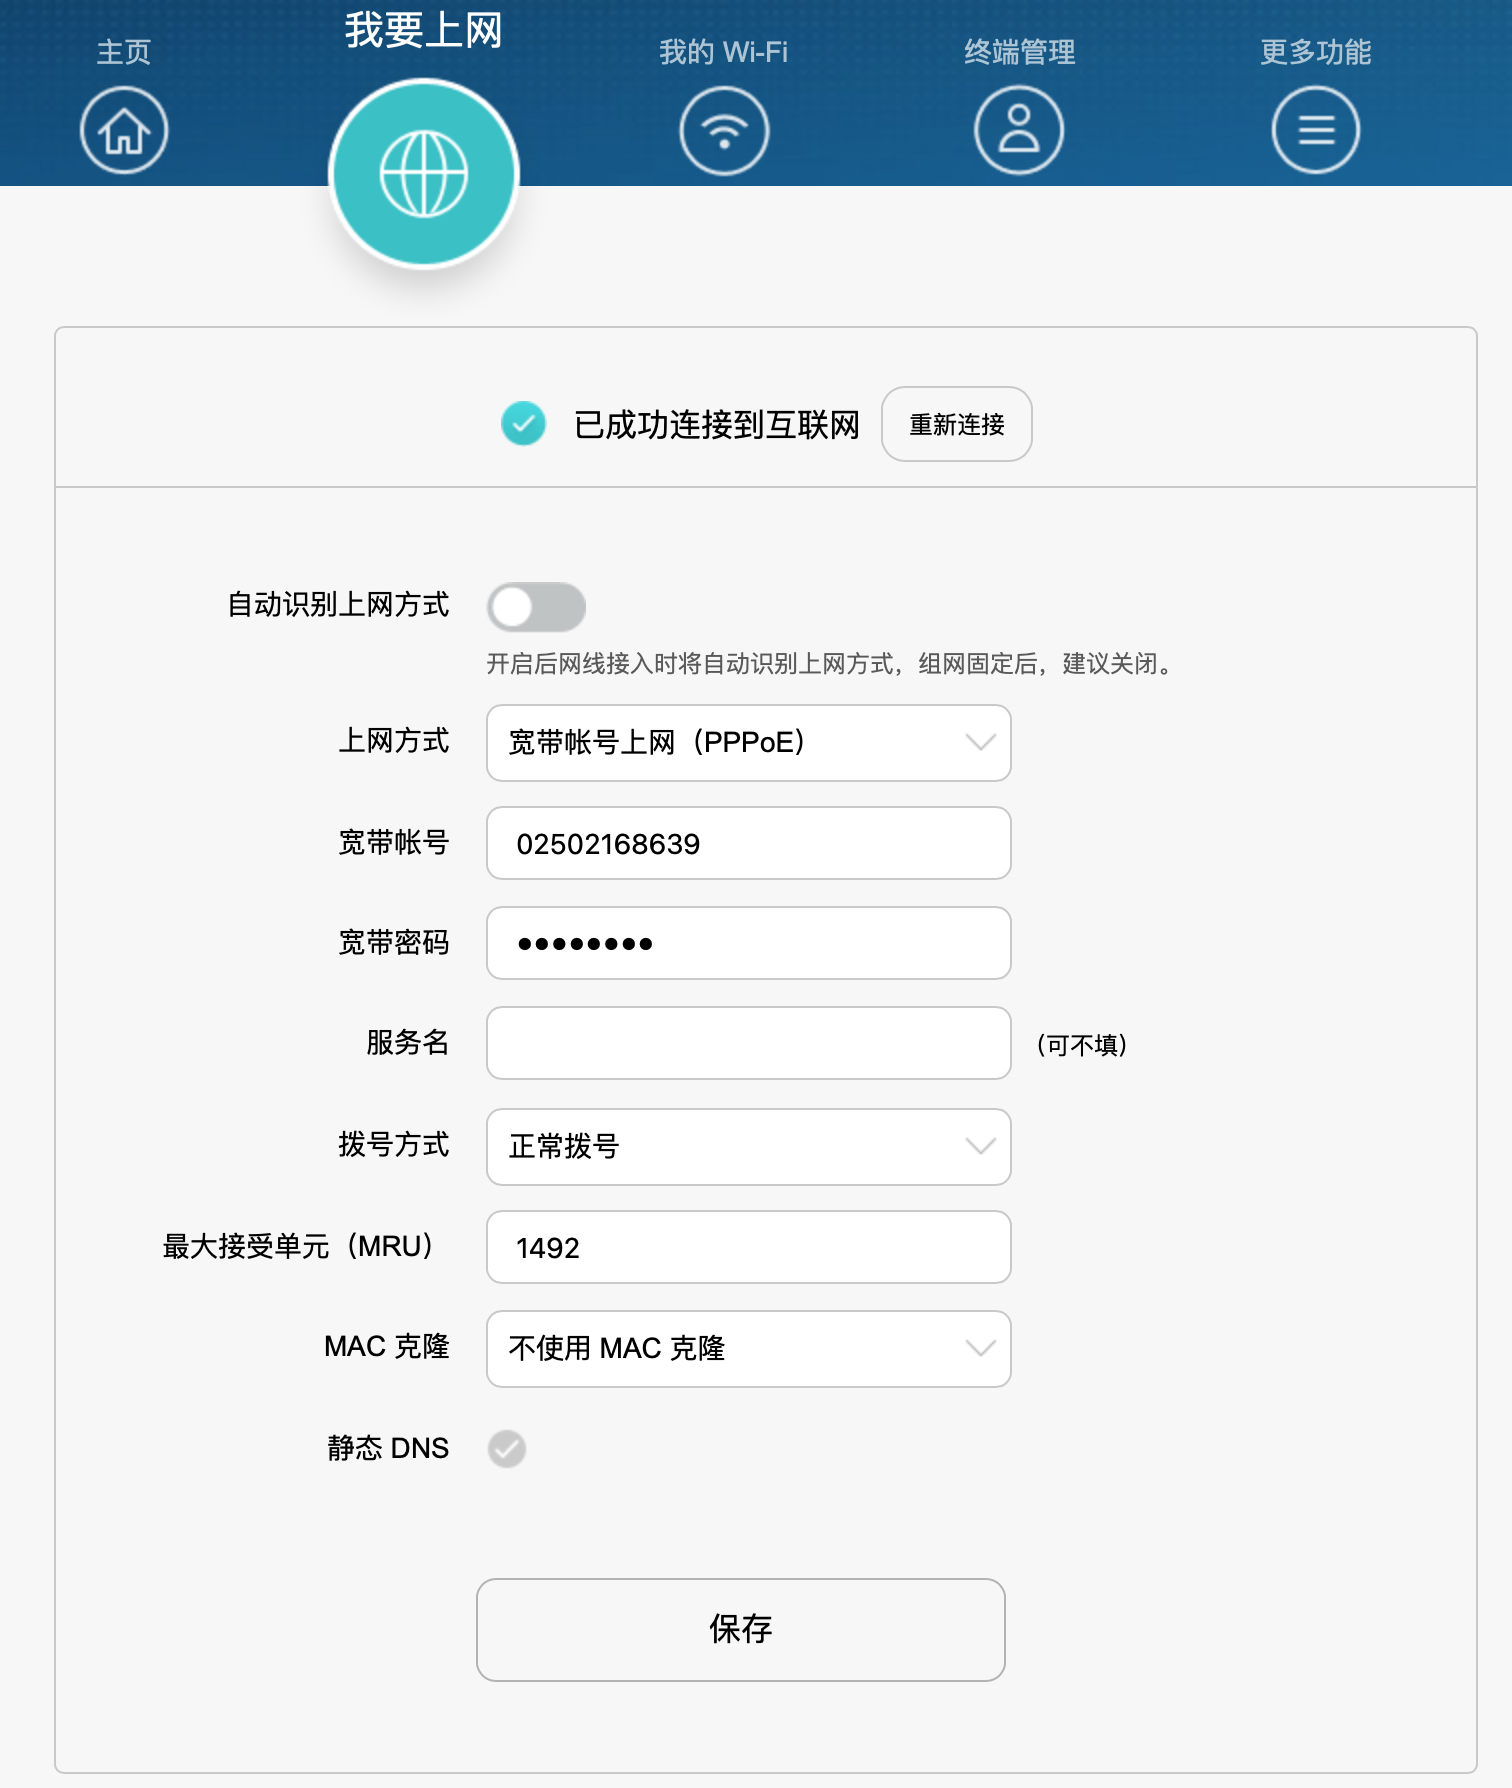
2、登陆路由器,修改为拨号方式并填写好拨号账号和密码,同时设置好dmz方式(将局域网的设备(ipv4)暴露给外网)
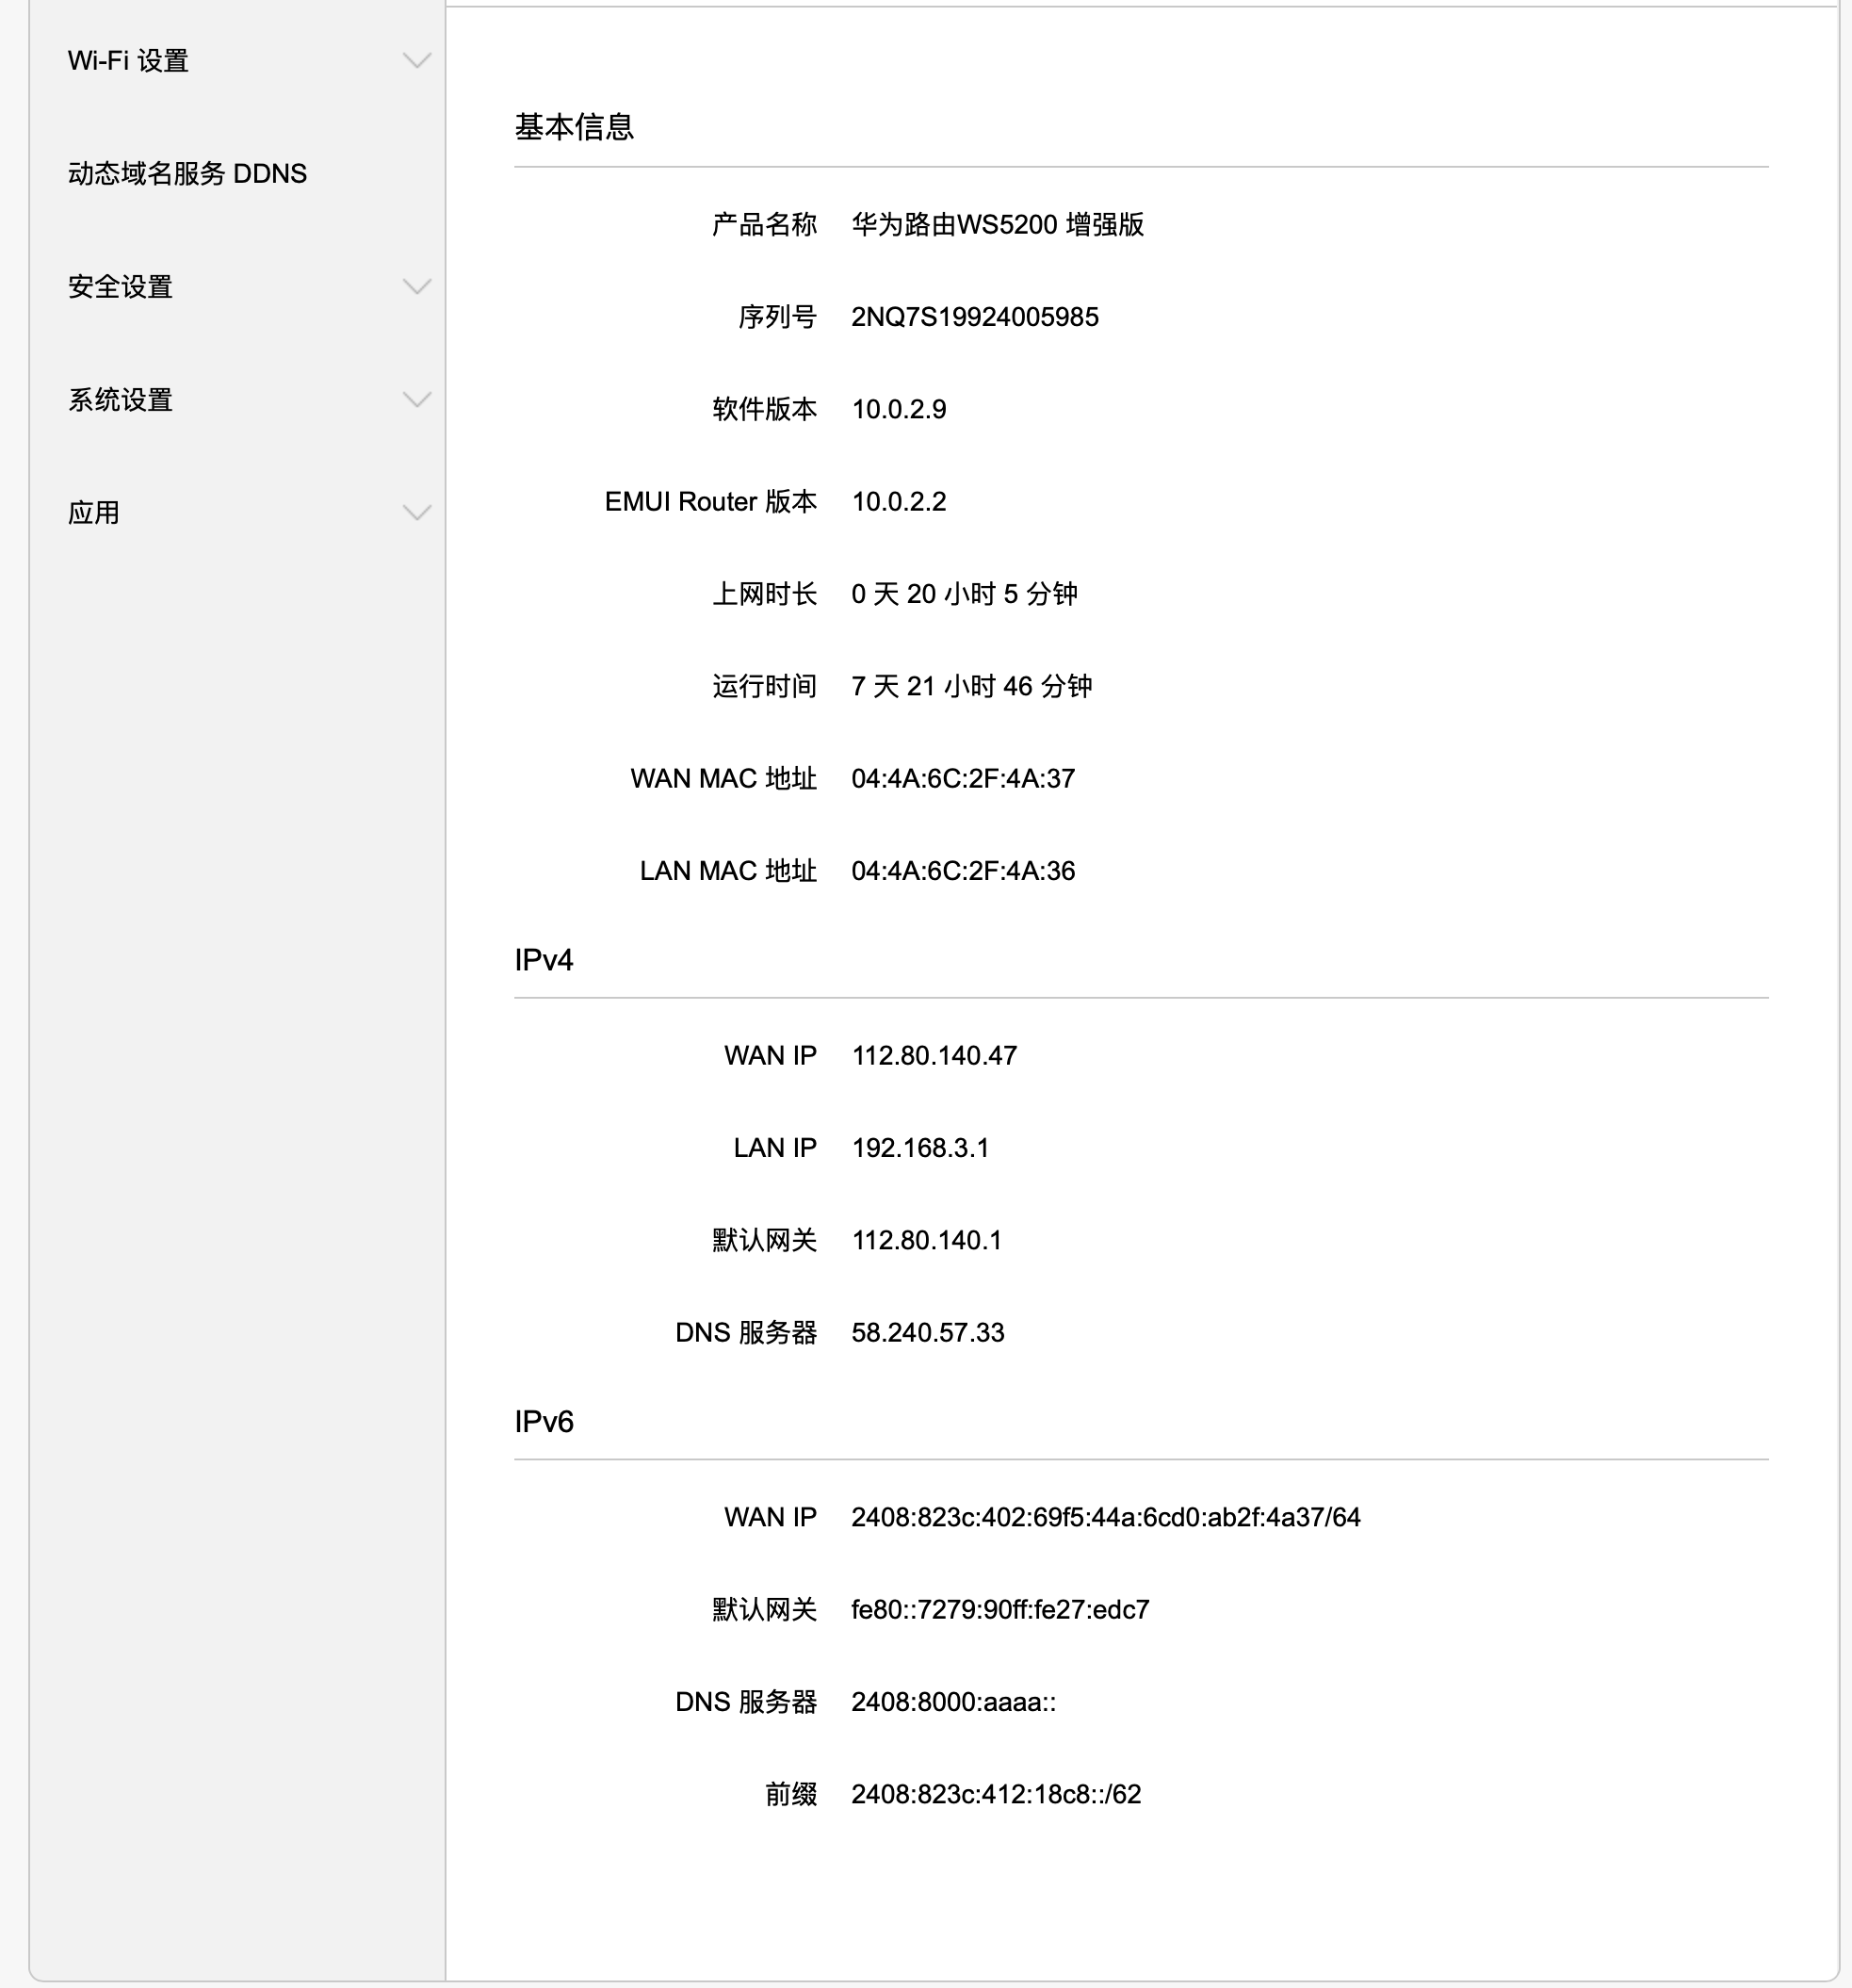
3、登陆局域网设备,获取ipv6地址
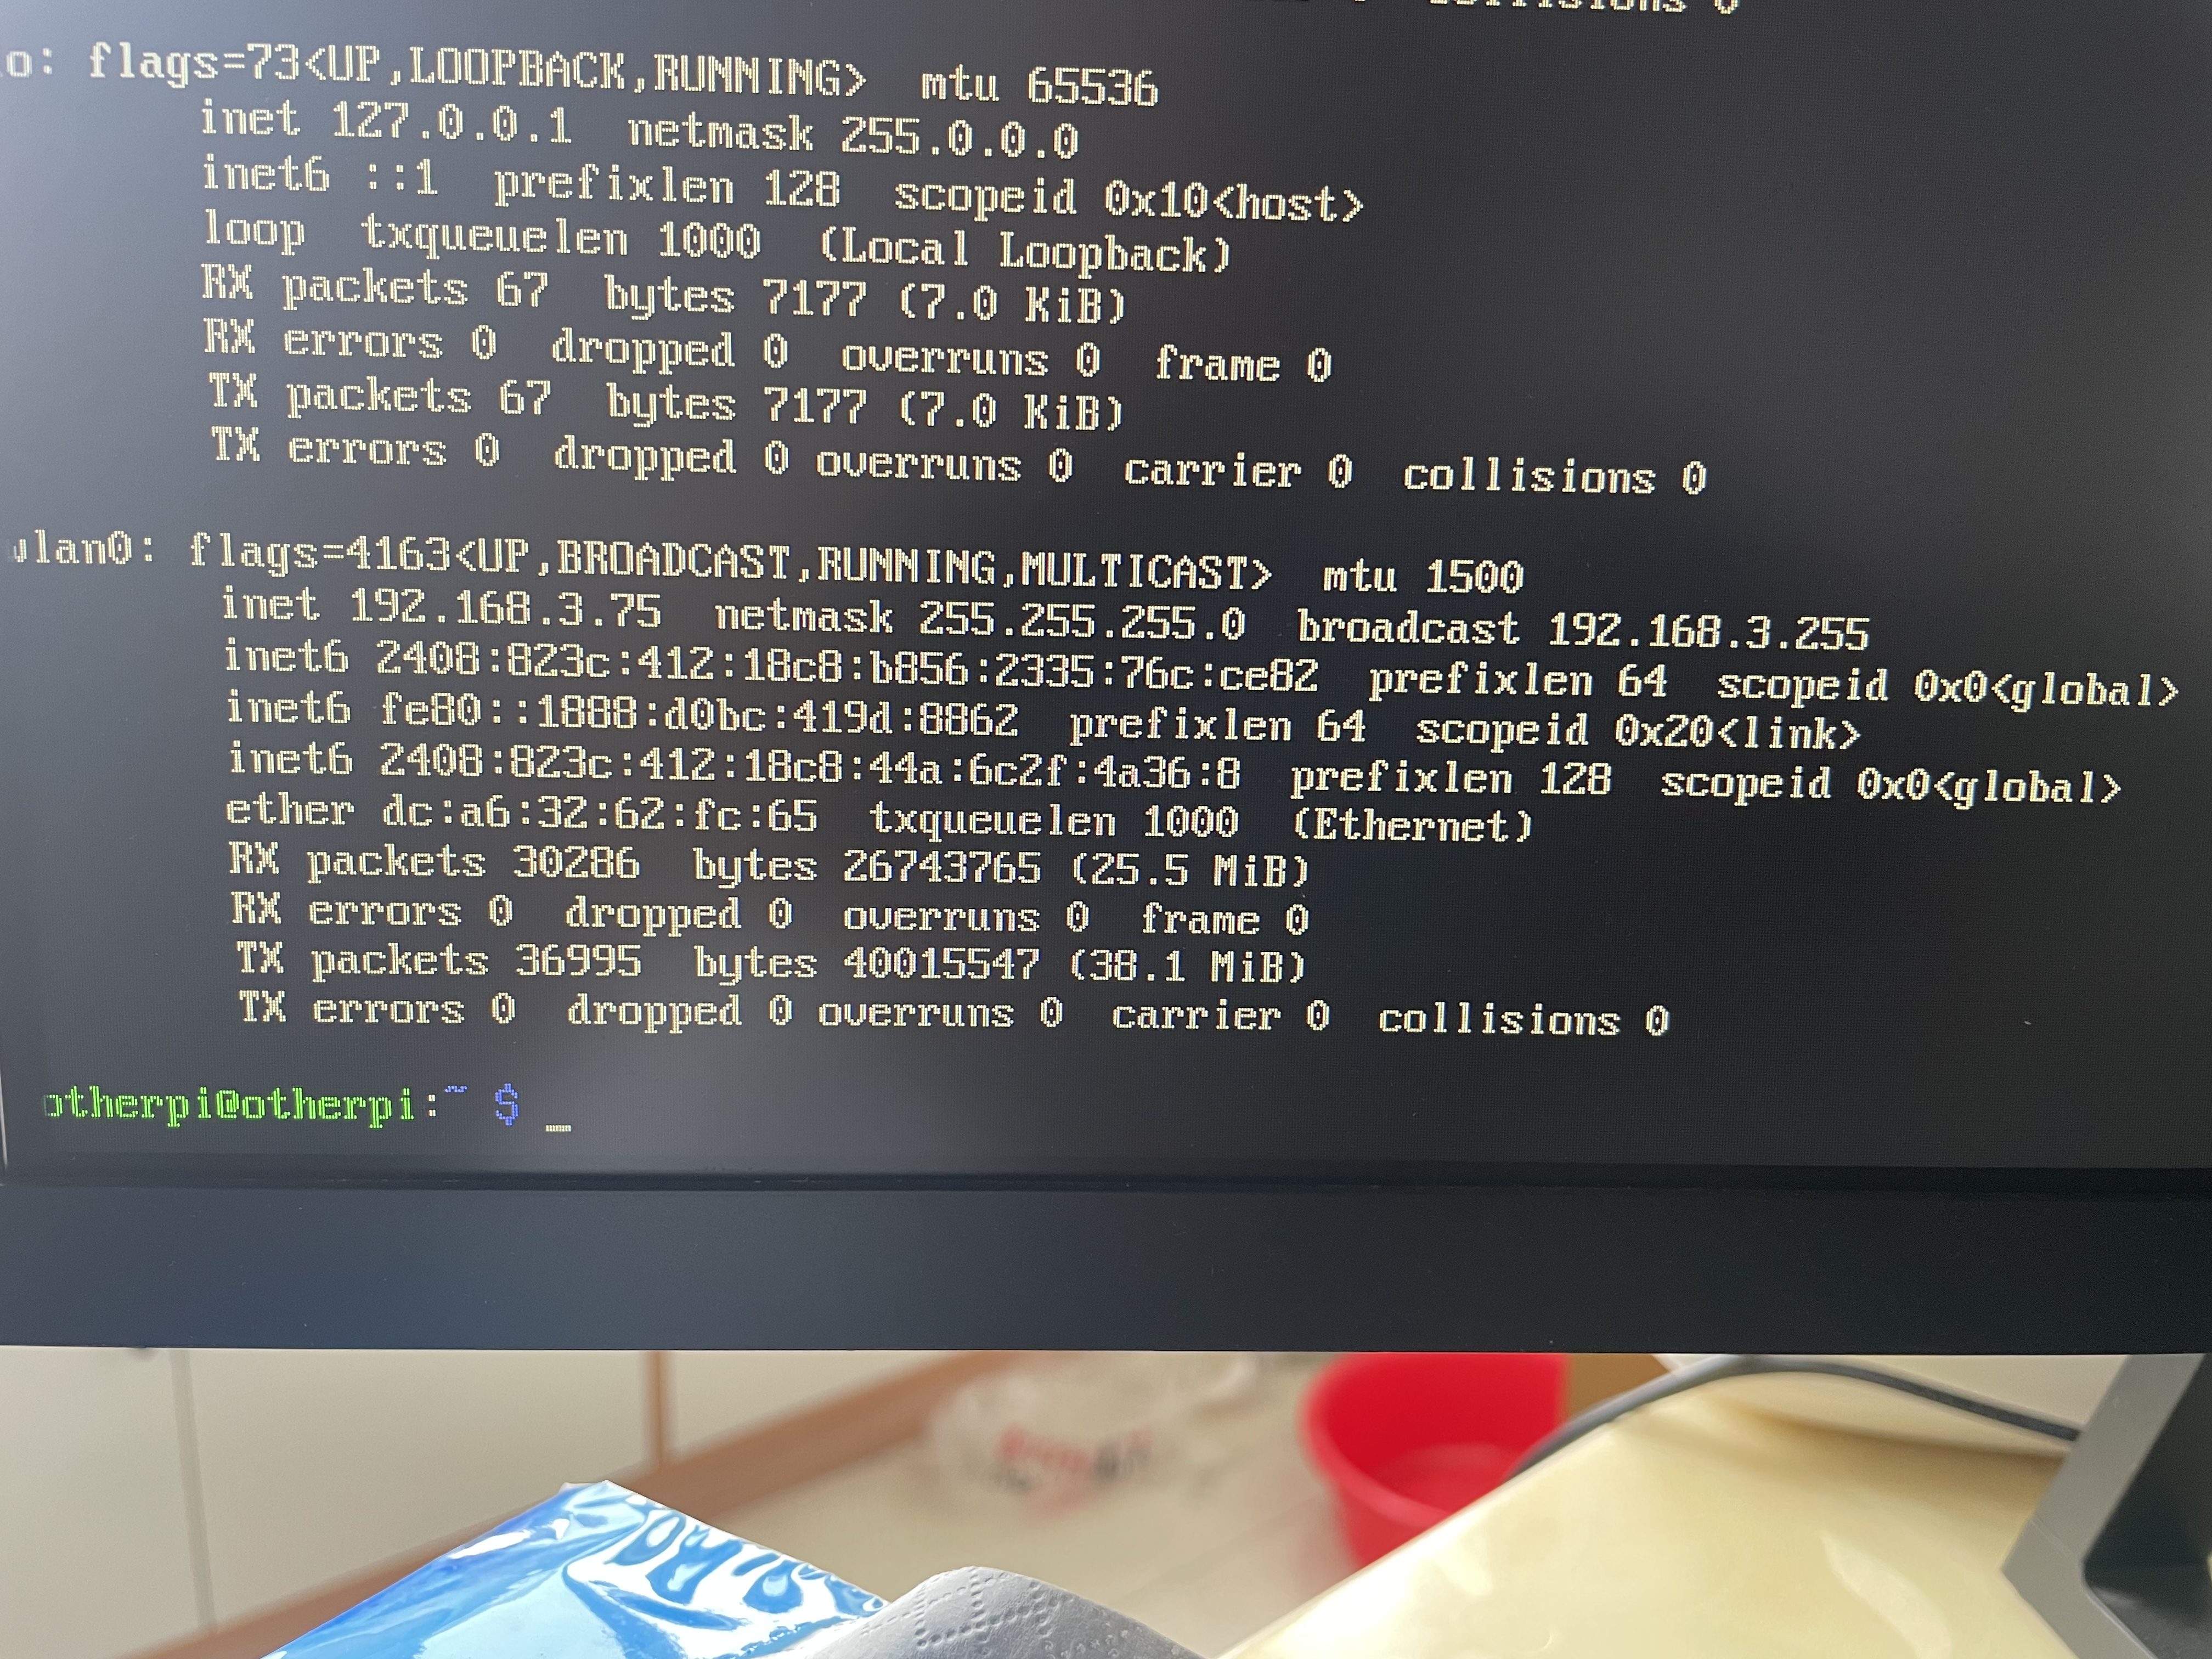
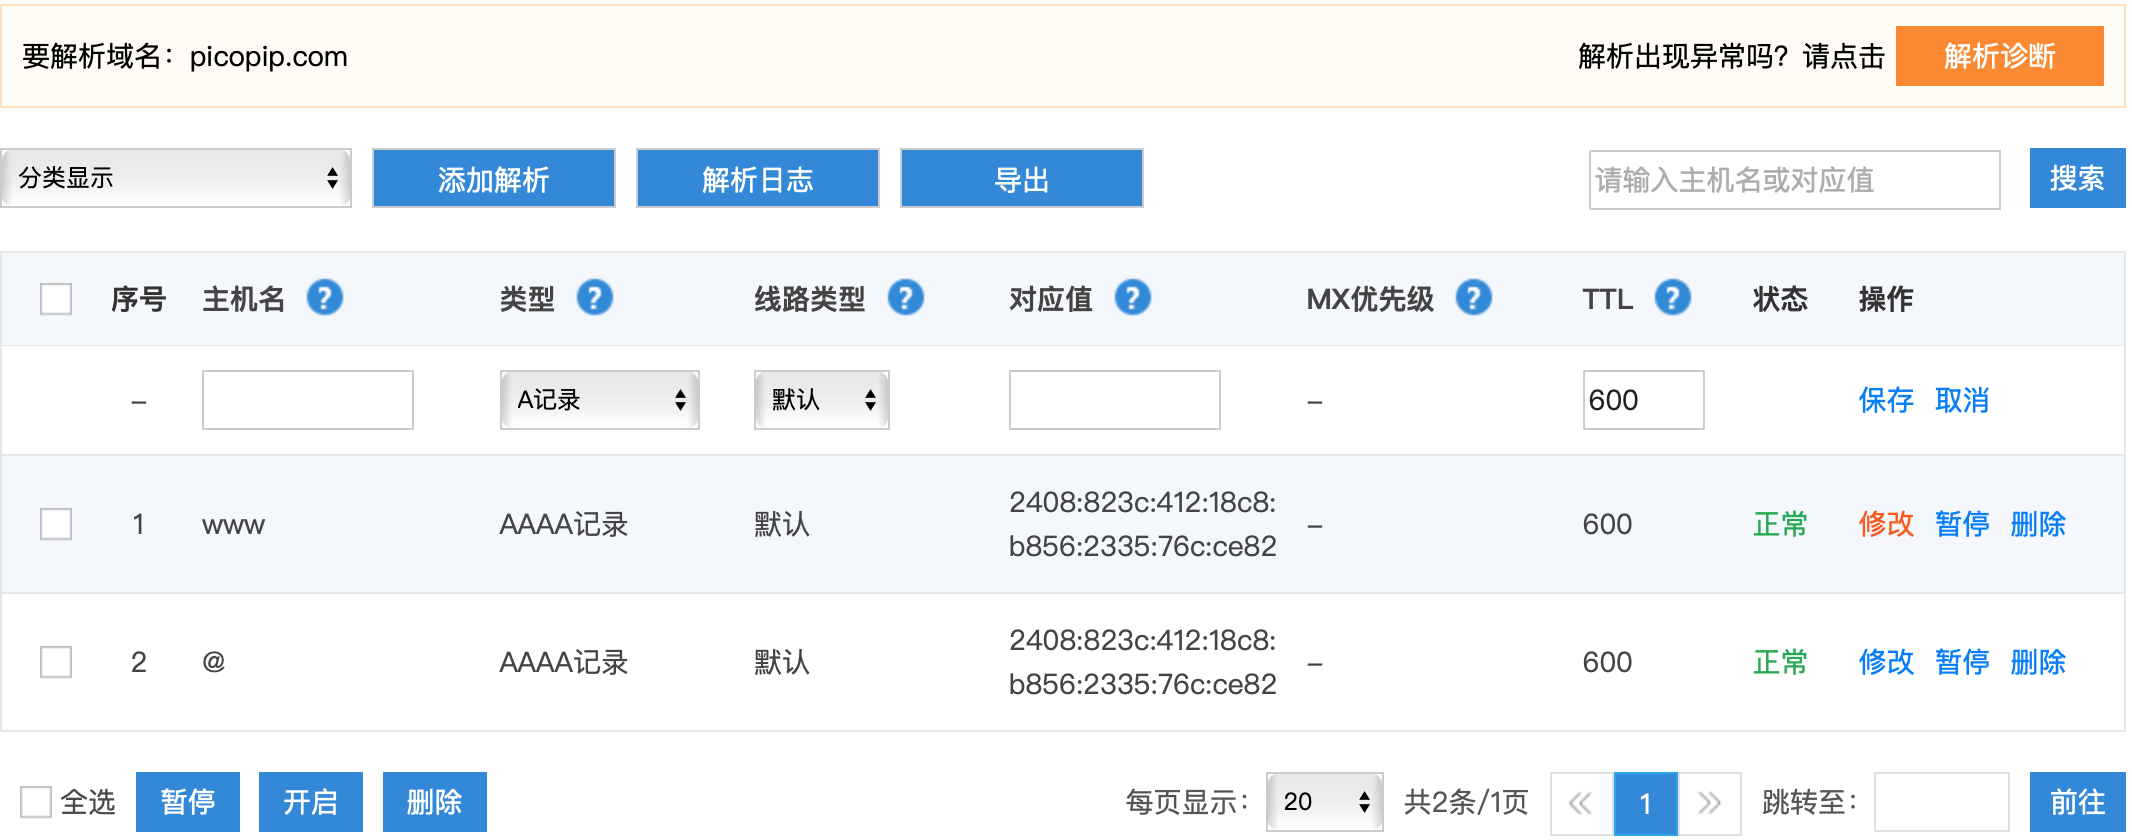
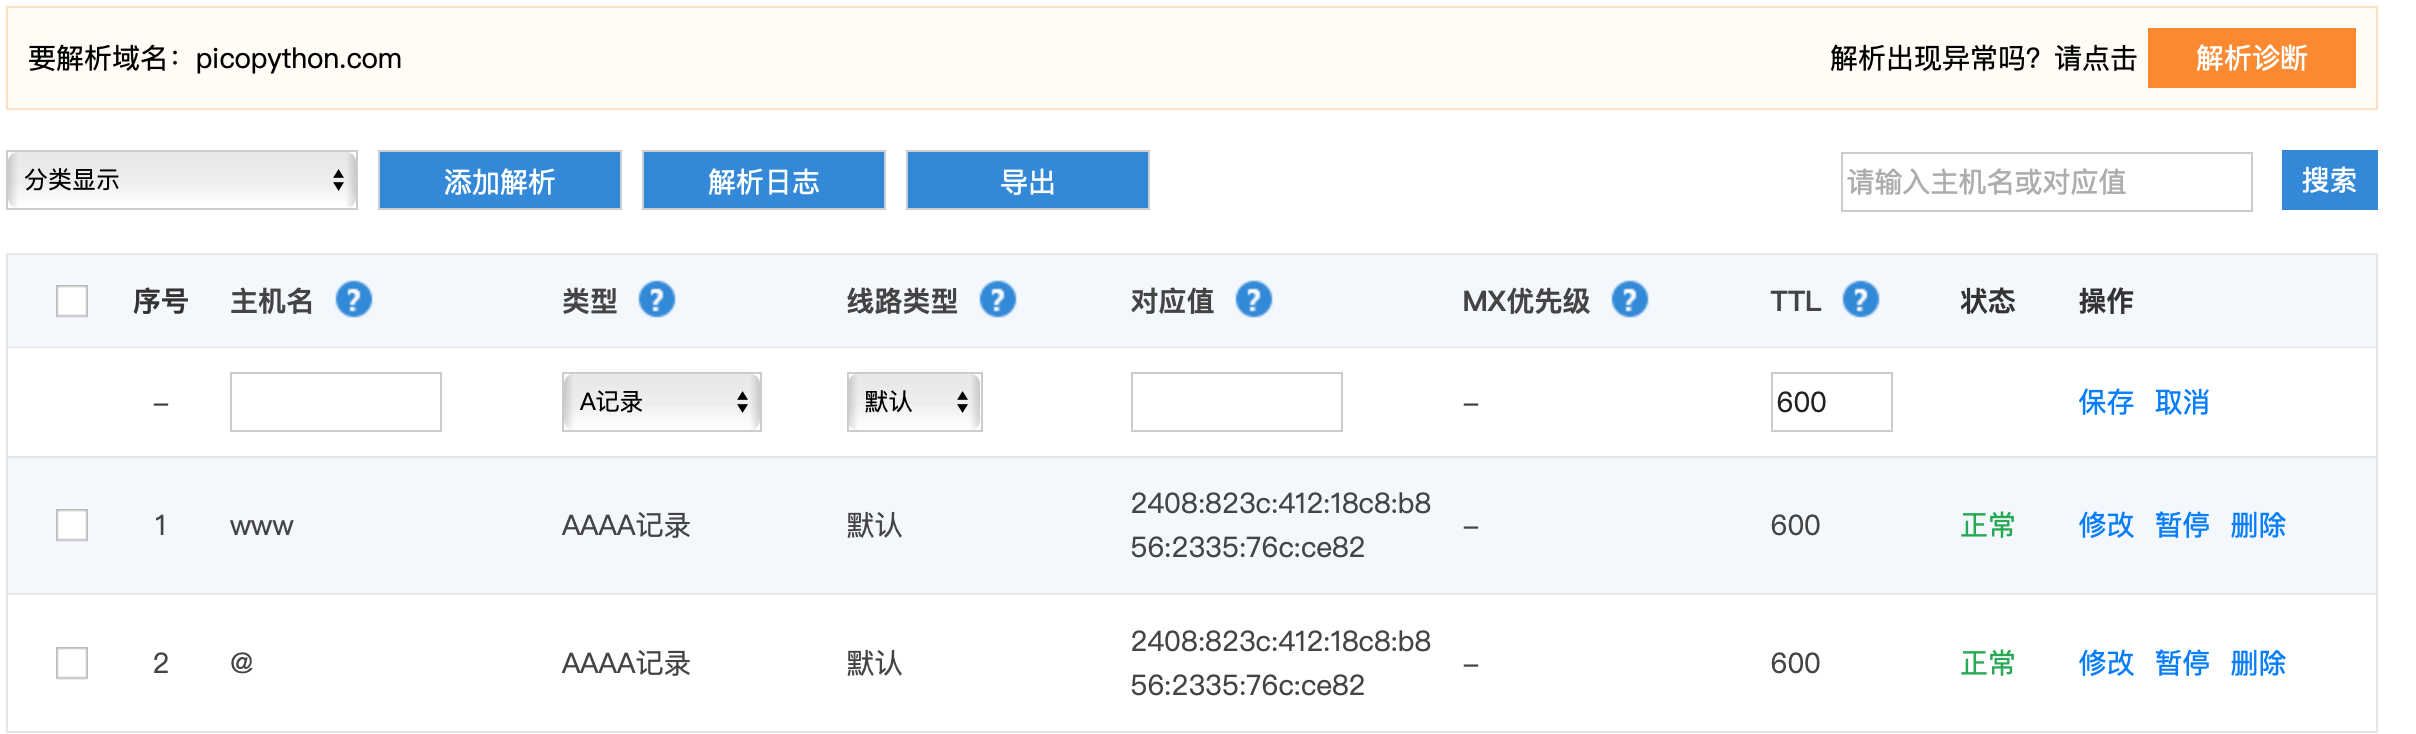
4、通过域名后台,设置ipv6解析
php 7.4.4
树莓派制作的海上人员搜救飞机
树莓派4b更新(系统引导程序)EEPROM Boot loader
树莓派 4B 板载了 EEPROM 芯片,参数为 4MBits/512KB,通过 SPI 协议读写。出厂时已写入了 Boot loader(系统引导程序)。通常不需要自己手动管理系统引导程序。只在必要的时候,可以通过更新树莓派 EEPROM 中的引导程序获得新的功能(需要在树莓派官方系统下进行更新操作)。引导程序更新的方法如下。
| 1 | sudo apt updatesudo apt upgrade# 安装更新工具sudo apt install rpi-eeprom# 检测更新sudo rpi-eeprom-update |
如果检测到了新版本,程序会提示「需要更新」。这时可以采用两种方式:
1、官方自动更新
| 1 | sudo rpi-eeprom-update -a |
更新完成重启即可。需要注意的是,此命令自动更新为正式版最新固件,如果需要更新到 beta 版本,可以采用下面这种方式。
2、自定义更新
获取树莓派最新的 EEPROM 固件。
| 1 | wget https://github.com/raspberrypi/rpi-eeprom/archive/master.zip # 解压下载的文件,然后进入相应的固件文件夹unzip master.zipcd rpi-eeprom-master/firmware/critical/ |
在 firmware 文件夹中,beta 为测试版本,critical 为稳定版本,可自行选择,测试版固件请慎用,如果变砖了就很难恢复。用下面的命令更新固件。
| 1 | sudo rpi-eeprom-update -d -f 固件文件名 |
更新完成后会提示「更新完成」,然后重启树莓派就更新好了!
| 1 | sudo reboot |
密码保护:基于mqtt的homeassistant温湿度采集
frp 配置


实际案例
frps端
sudo nano /lib/systemd/system/frps.service
服务端:
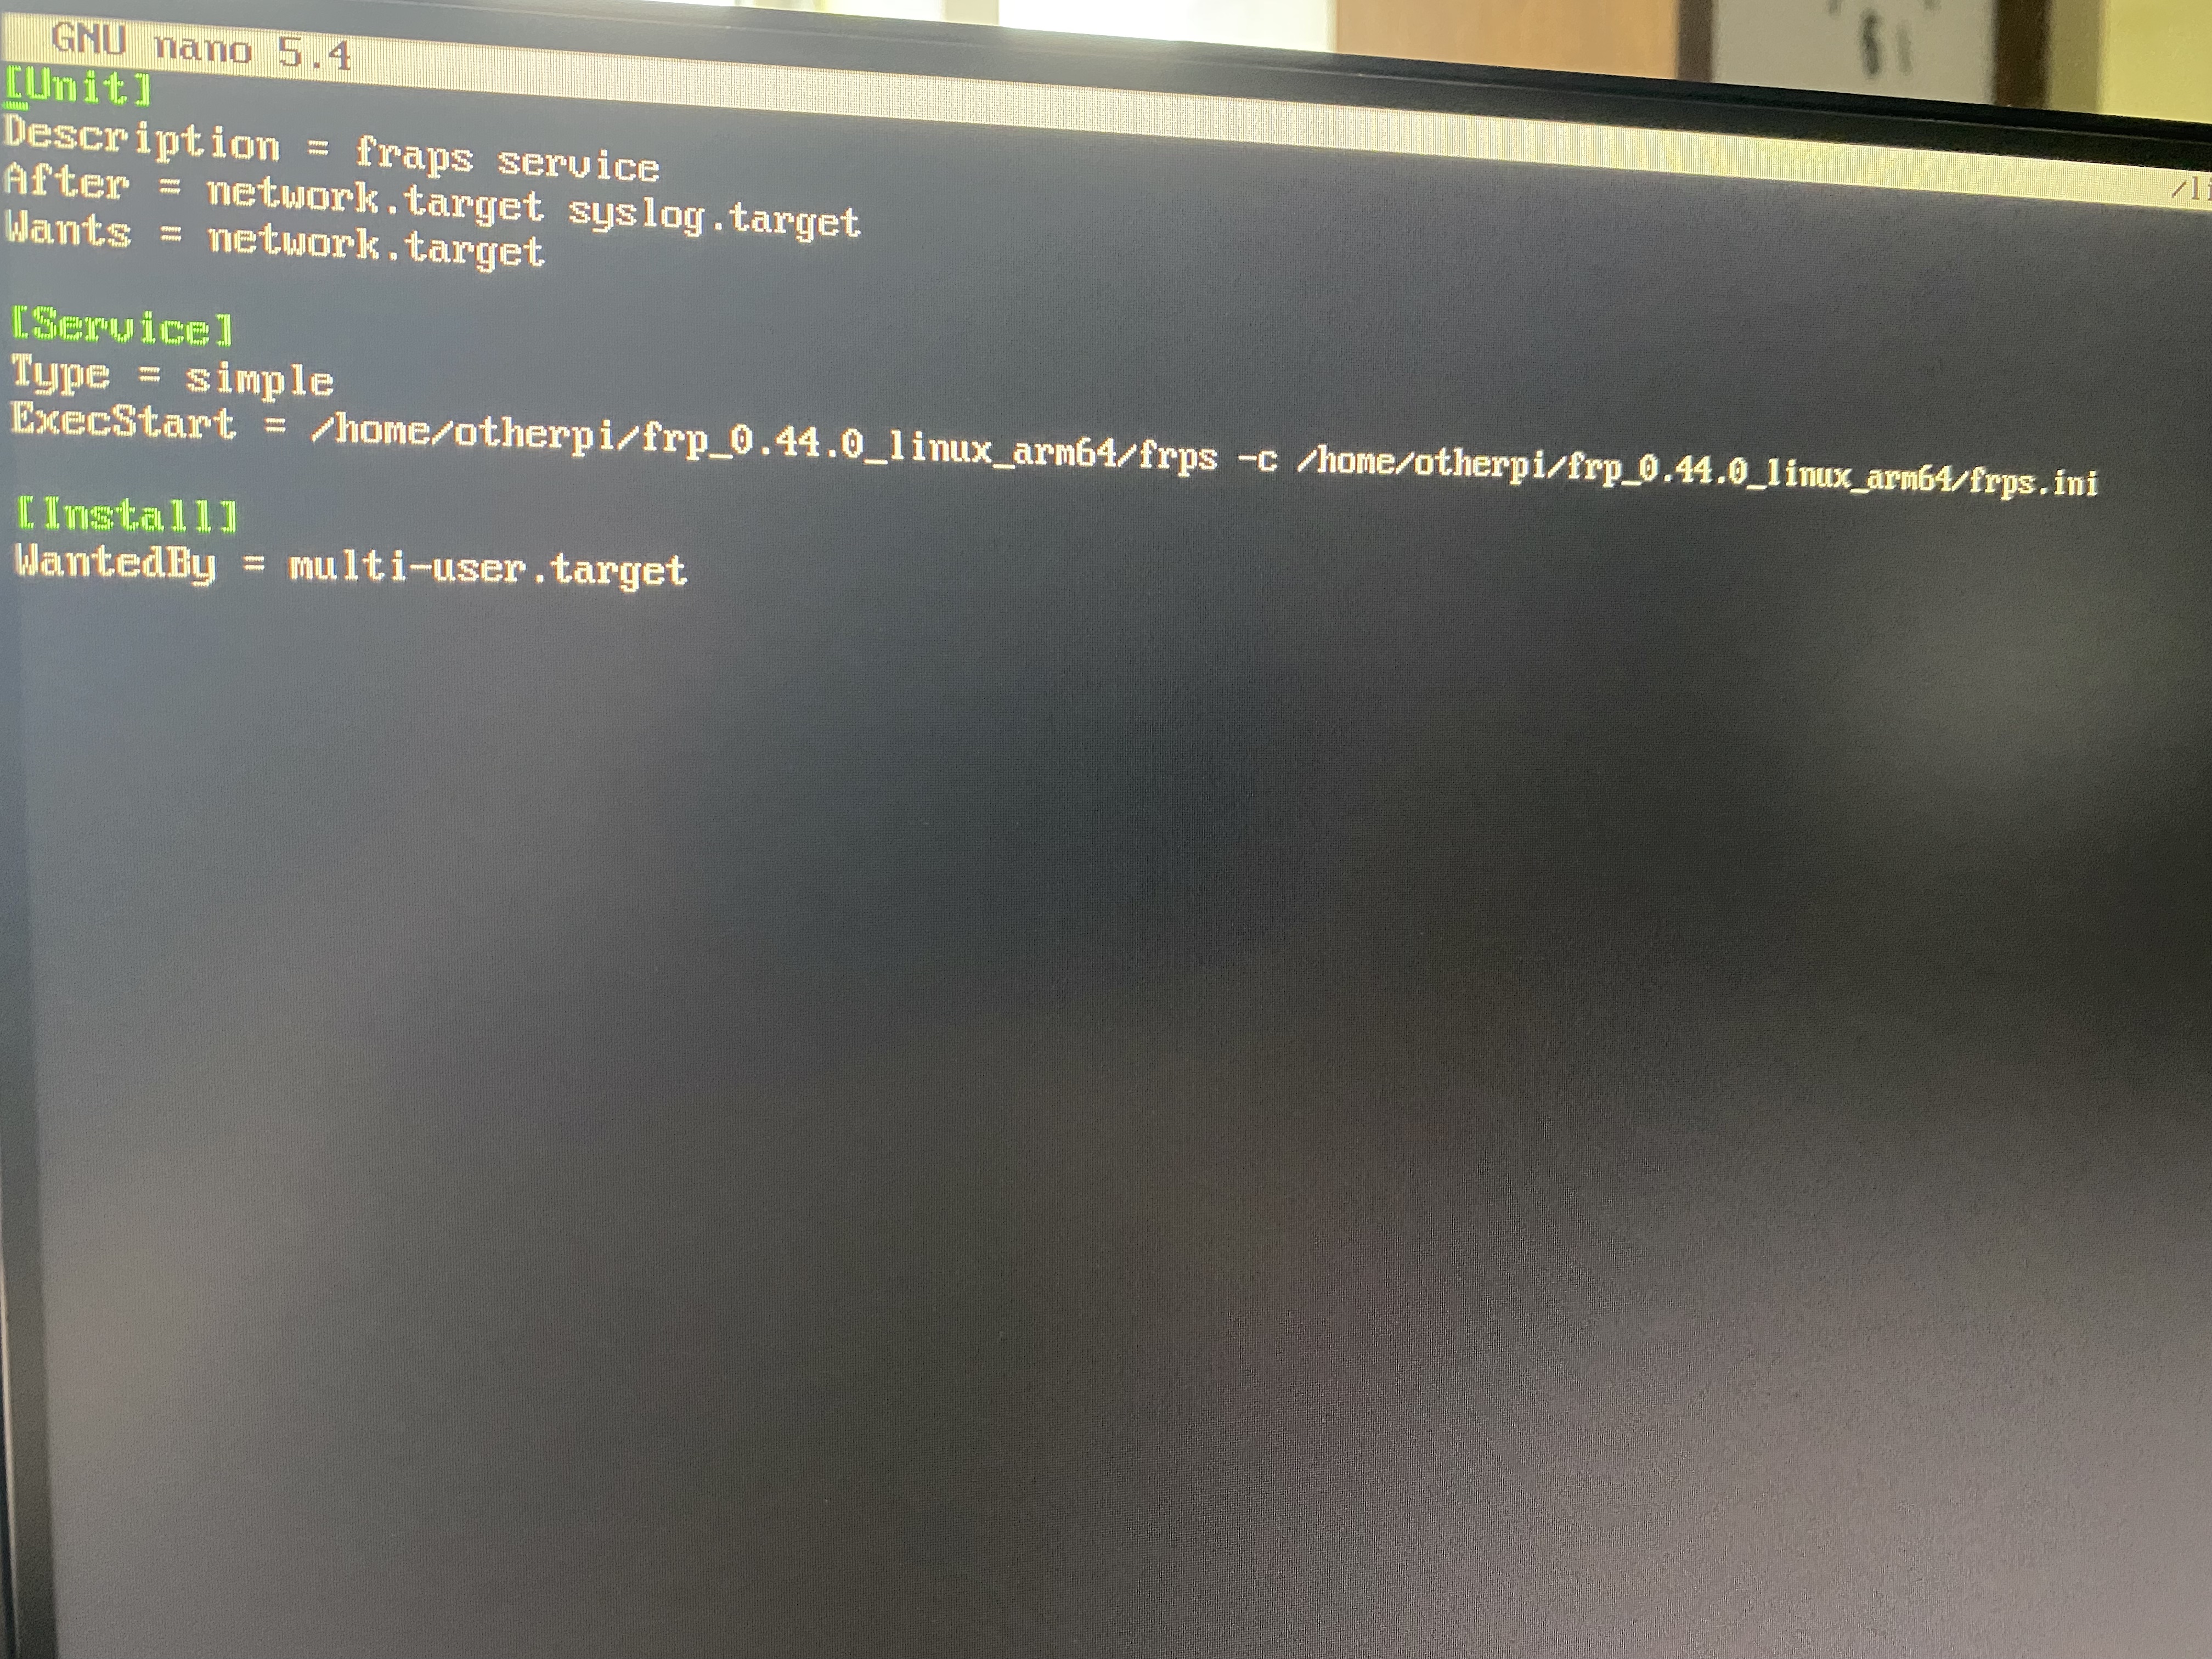
sudo nano /lib/systemd/system/frps.service
[Unit]
Description=fraps service
After=network.target syslog.target
Wants=network.target

[Service]
Type=simple
#启动服务的命令(此处写你的frps的实际安装目录)
ExecStart=/opt/soft/frp/frp_0.33.0_linux_amd64/frps -c /opt/soft/frp/frp_0.33.0_linux_amd64/frps.ini

[Install]
WantedBy=multi-user.target
# 启动frps
sudo systemctl start frps

# 打开自启动
sudo systemctl enable frps

# 重启应用
sudo systemctl restart frps

# 停止应用
sudo systemctl stop frps

# 查看应用的日志
sudo systemctl status frps

# 停止开机自启动
systemctl disable frps
客户端:
sudo nano /lib/systemd/system/frpc.service
[Unit]
Description=frpc service
After=network.target syslog.target
Wants=network.target

[Service]
Type=simple
#启动服务的命令(此处写你的frpc的实际安装目录)
ExecStart=/opt/soft/frp/frp_0.33.0_linux_amd64/frpc -c /opt/soft/frp/frp_0.33.0_linux_amd64/frpc.ini

[Install]
WantedBy=multi-user.target
frpc端
设置自定义域名
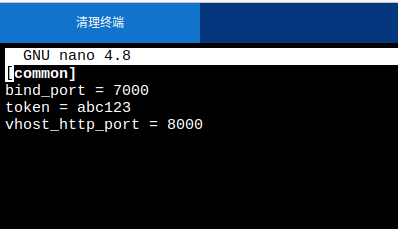
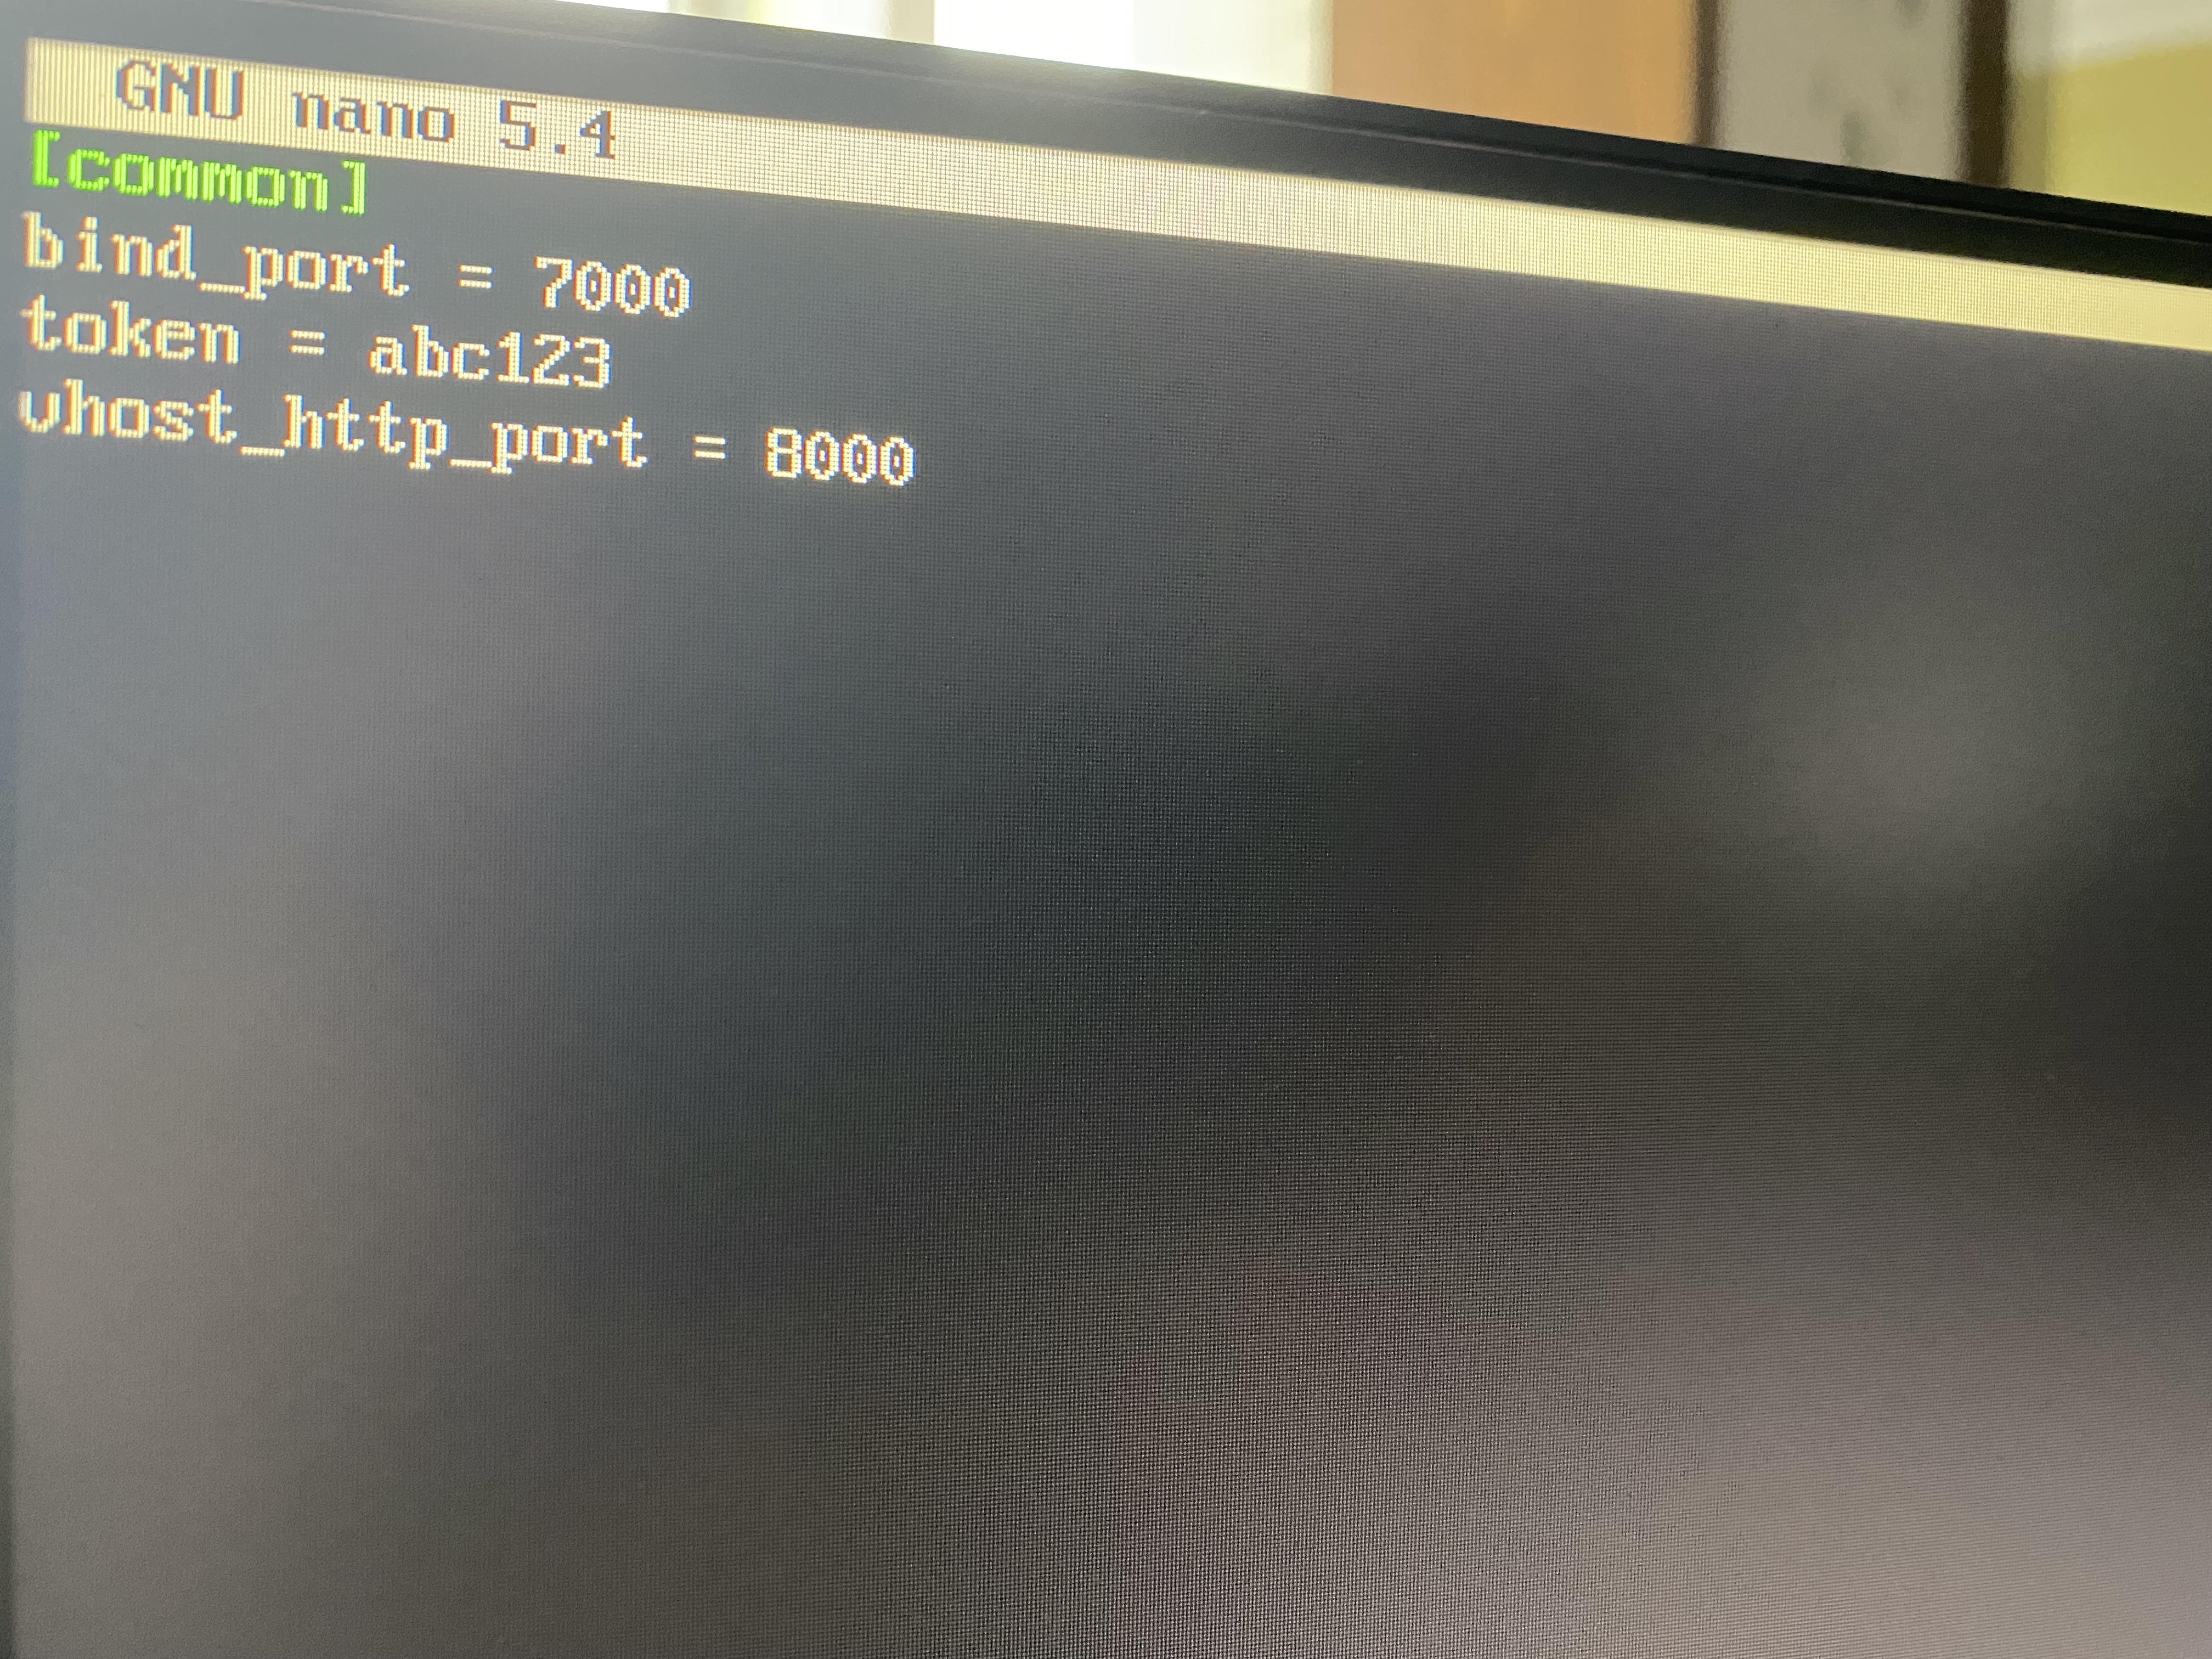
frps.ini
# frps.ini
[common]
bind_port = 7000  #与客户端绑定的进行通信的端口
vhost_http_port = 80  #访问客户端web服务自定义的端口号
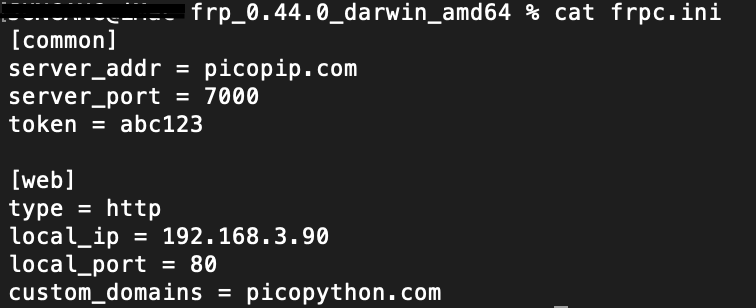
frpc.ini
# frpc.ini
[common]
server_addr = x.x.x.x #公网服务器ip
server_port = 7000 #与服务端bind_port一致
#公网通过ssh访问内部服务器
[ssh]
type = tcp #连接协议
local_ip = 192.168.3.48 #内网服务器ip
local_port = 22 #ssh默认端口号
remote_port = 6000 #自定义的访问内部ssh端口号[web]
type = http
local_port = 80 #内网web服务的端口号
custom_domains = www.yourdomain.com #所绑定的公网服务器域名,一级、二级域名都可以
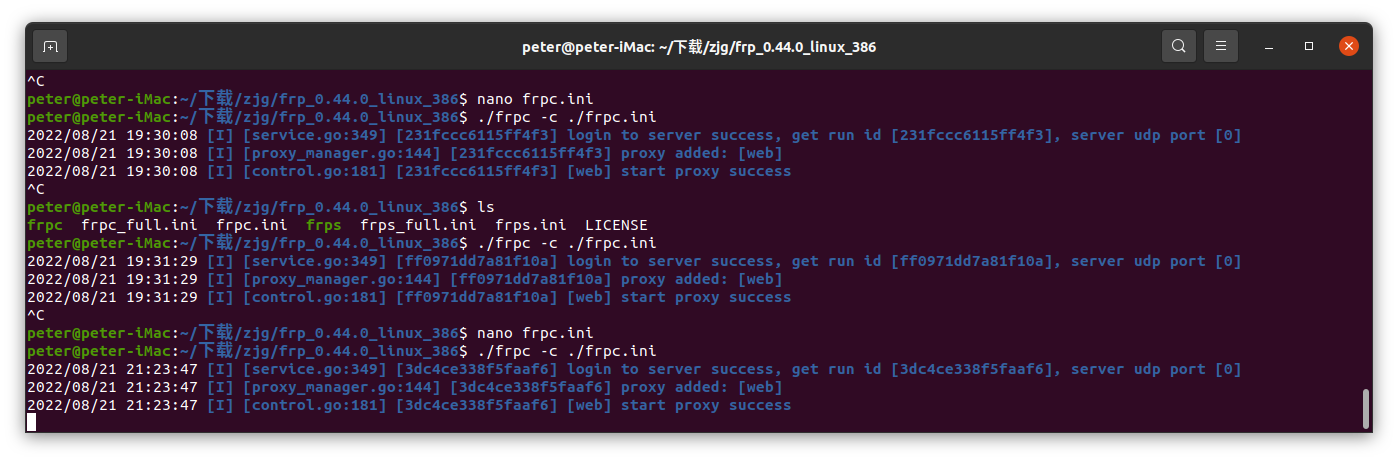
#保存然后启动服务./frps -c ./frps.ini,这是前台启动,后台启动命令为nohup ./frps -c ./frps.ini &
#保存然后执行./frpc -c ./frpc.ini启动,这是前台启动,后台启动命令为nohup ./frpc -c ./frpc.ini &
经验证
[Unit]
Description=frpc service
After=network.target
Wants=network.target

[Service]
#一开始没加这两行,frp总是起不来
Restart = on-failure
RestartSec = 5

#启动服务的命令(此处写你的frpc的实际安装目录)
ExecStart=/home/pi/Downloads/frp_0.44.0_linux_arm/frpc -c /home/pi/Downloads/frp_0.44.0_linux_arm/frpc.ini

[Install]
WantedBy=multi-user.target
frp下载
http://www.mixdiy.com/wp-content/uploads/2022/08/frp_0.44.0_linux_arm64.zip
http://www.mixdiy.com/wp-content/uploads/2022/08/frp_0.44.0_linux_arm.zip
http://www.mixdiy.com/wp-content/uploads/2022/08/frp_0.44.0_linux_386.zip
http://www.mixdiy.com/wp-content/uploads/2022/08/frp_0.44.0_darwin_amd64.tar