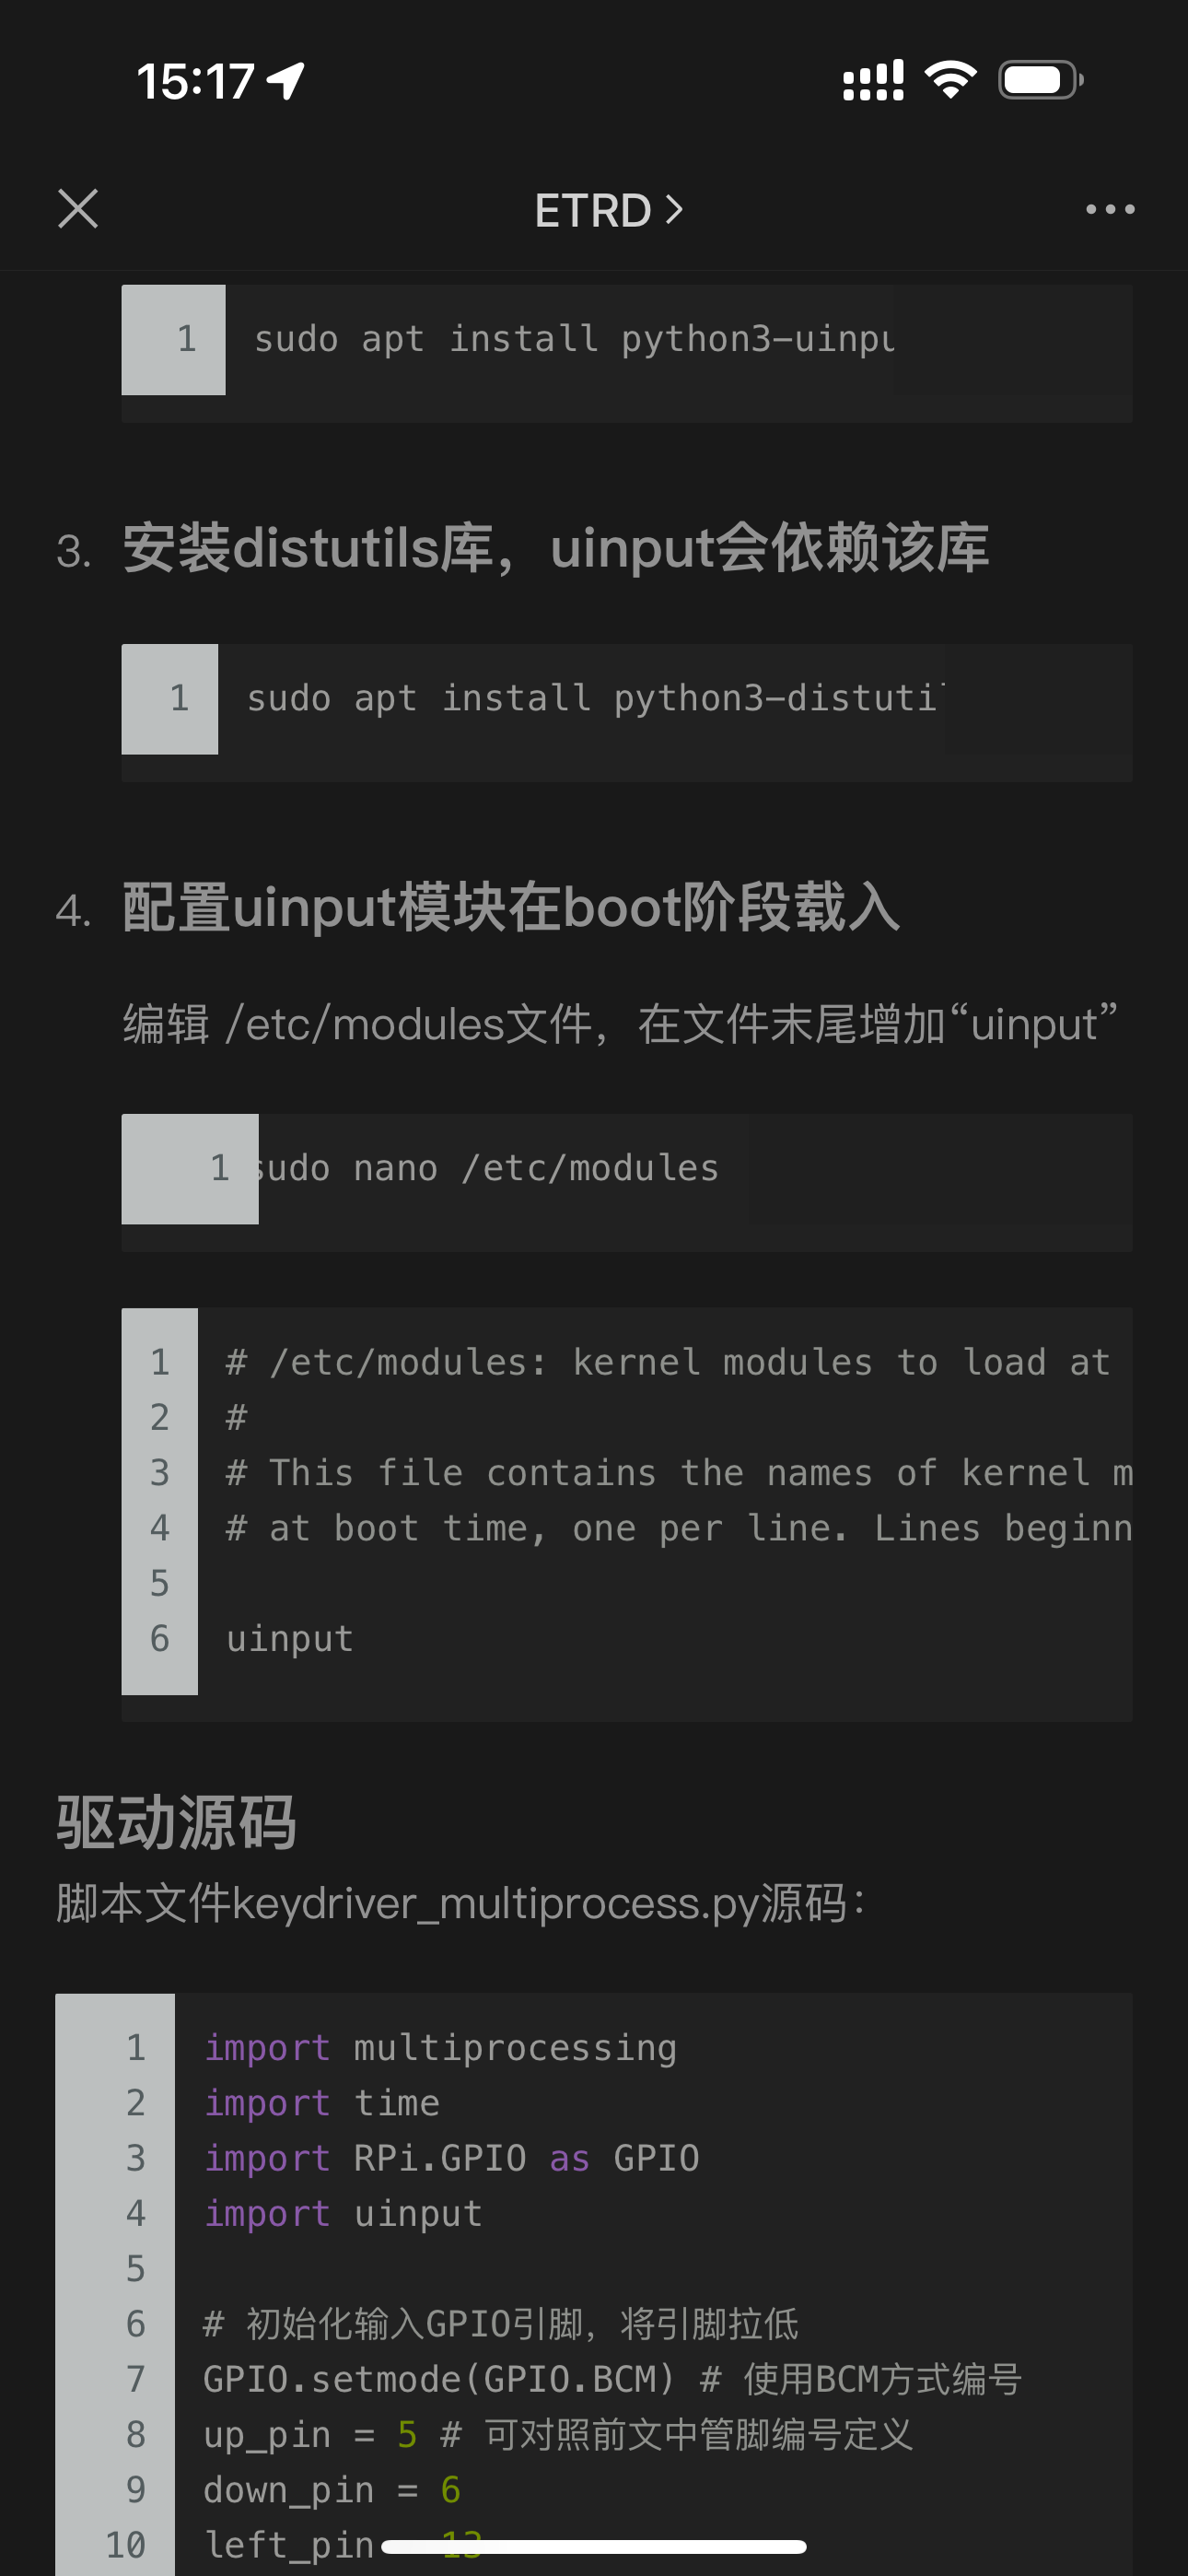
import RPi.GPIO as GPIO
import time
from sys import version_info
import uinput
device = uinput.Device([
uinput.KEY_LEFTSHIFT,
uinput.KEY_TAB,
uinput.KEY_SPACE,
uinput.KEY_LEFTALT
])
if version_info.major == 3:
raw_input = input
# Set up pins
# Rotary A Pin
RoAPin = 17
# Rotary B Pin
RoBPin = 18
# Rotary Switch Pin
RoSPin = 27
def print_message():
print ("========================================")
print ("| Rotary Encoder |")
print ("| ------------------------------ |")
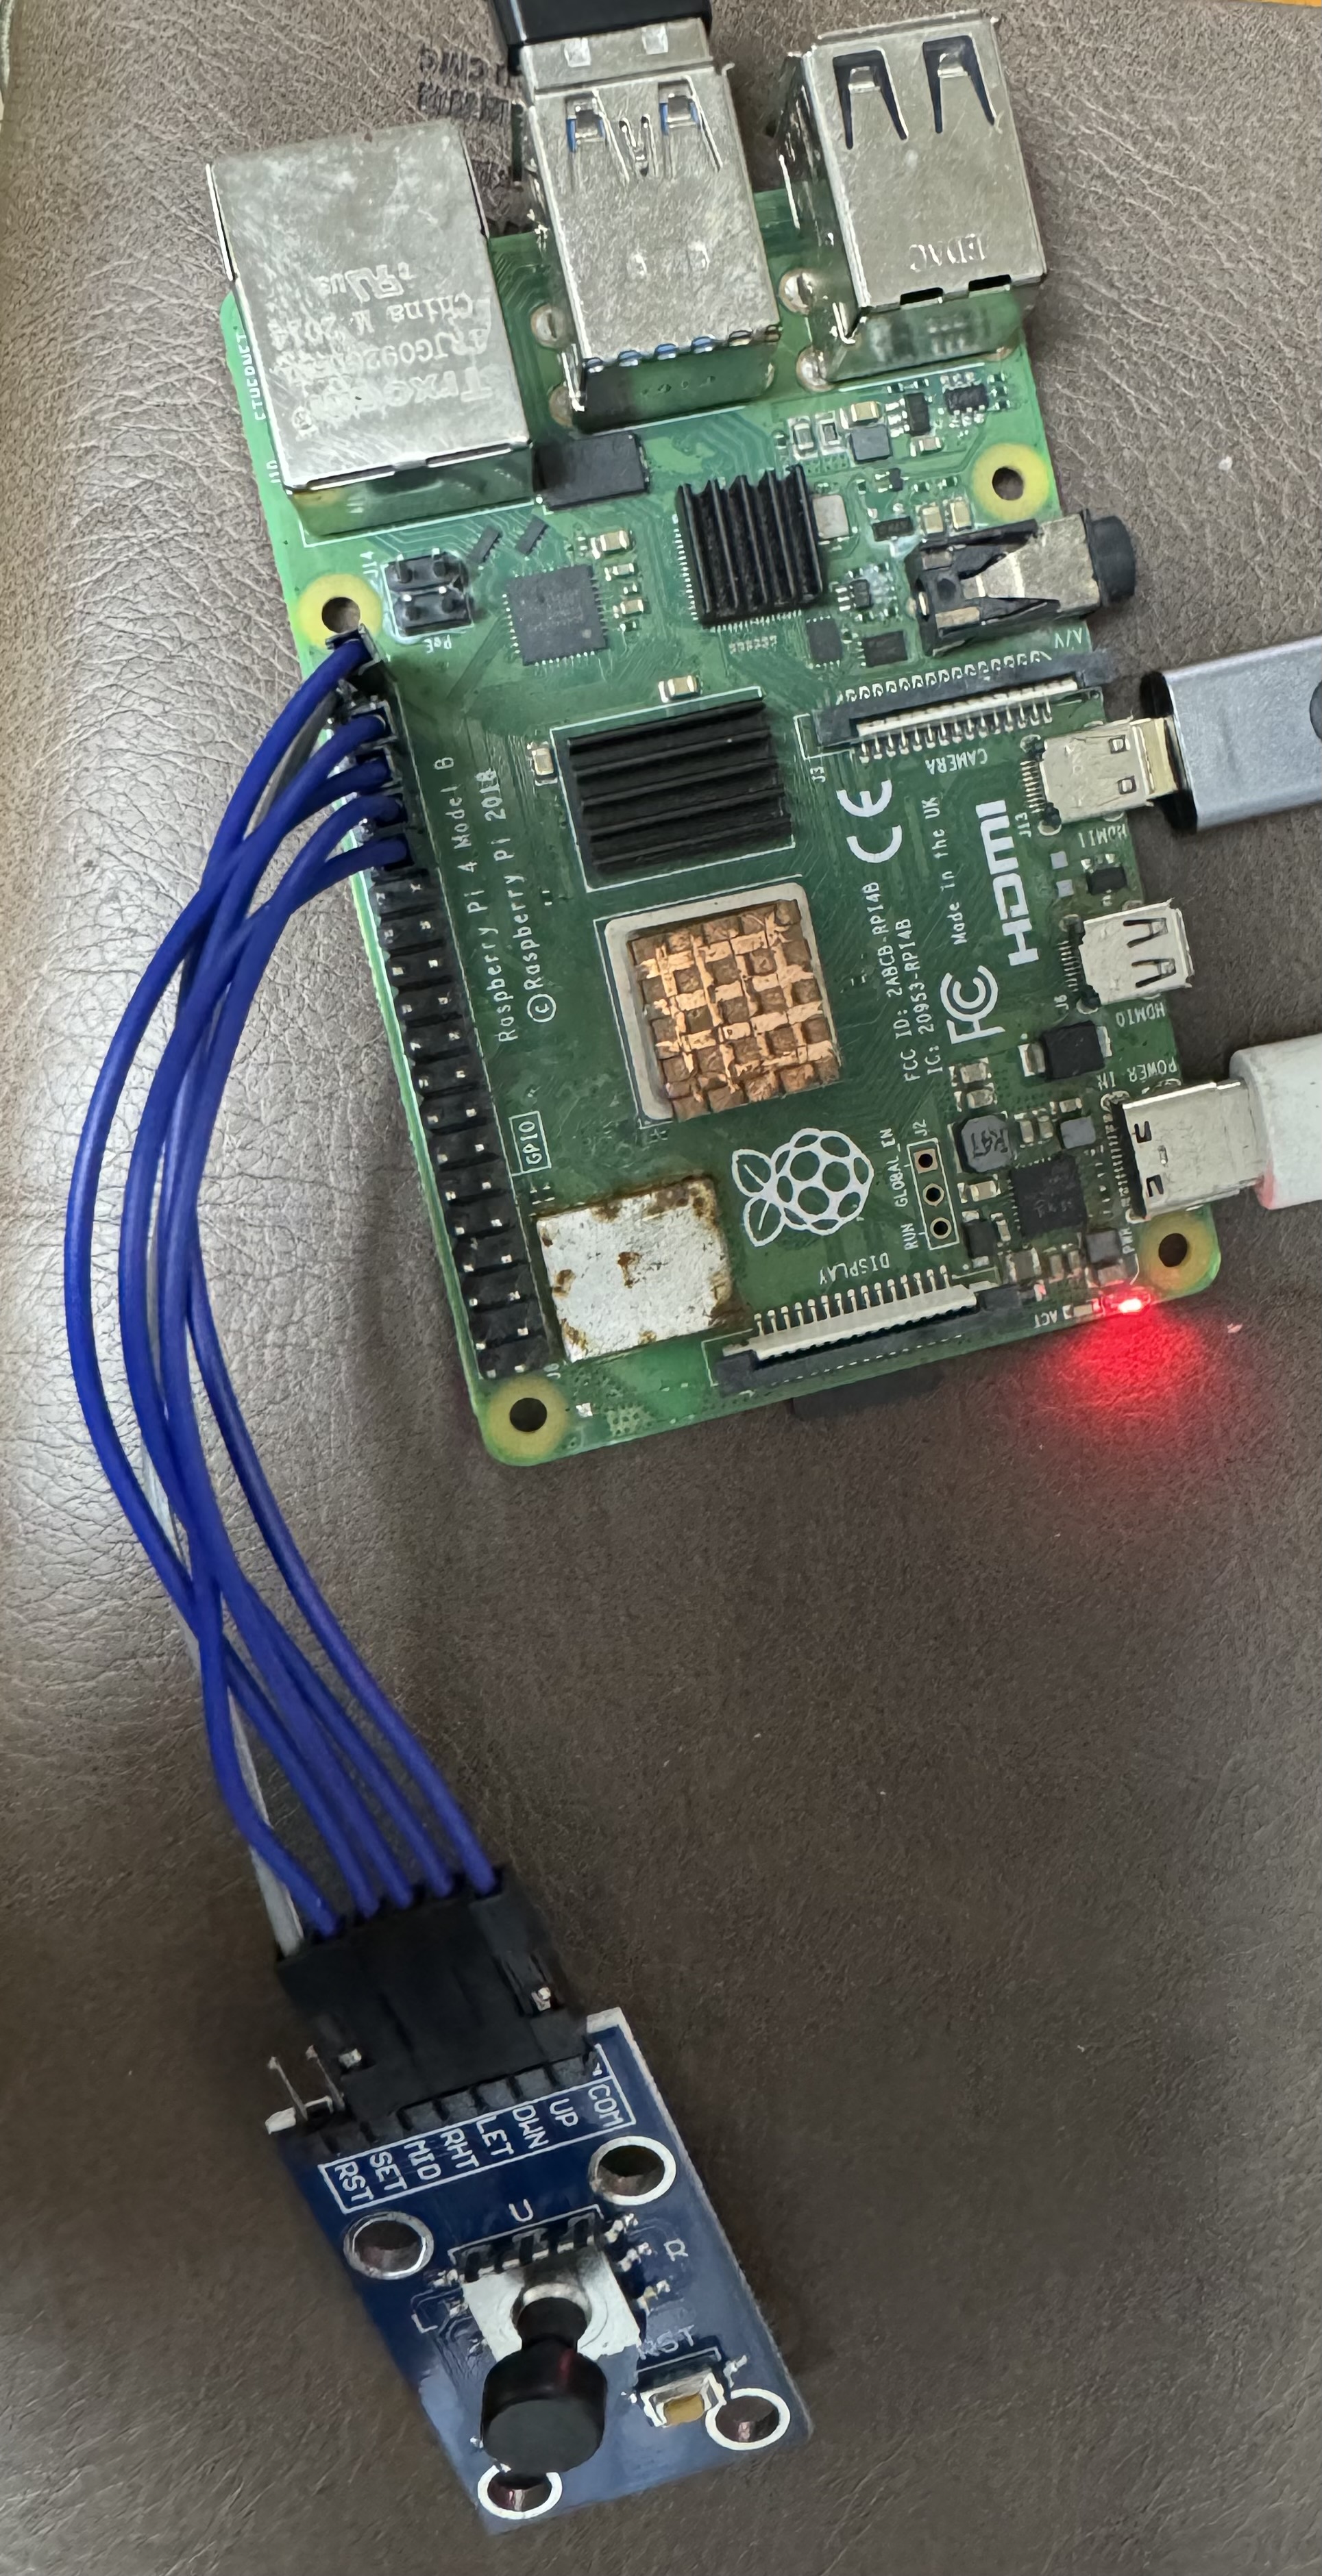
print ("| Pin A connect to GPIO17 |")
print ("| Pin B connect to GPIO18 |")
print ("| Button Pin connect to GPIO27 |")
print ("| |")
print ("| Use a Rotary Encoder |")
print ("| Rotary to add/minus counter |")
print ("| Press to set counter to 0 |")
print ("| |")
print ("| SunFounder|")
print ("========================================\n")
print ("Program is running...")
print ("Please press Ctrl+C to end the program...")
#raw_input ("Press Enter to begin\n")
def setup():
global counter
global Last_RoB_Status, Current_RoB_Status
GPIO.setmode(GPIO.BCM)
GPIO.setup(RoAPin, GPIO.IN)
GPIO.setup(RoBPin, GPIO.IN)
GPIO.setup(RoSPin,GPIO.IN, pull_up_down=GPIO.PUD_UP)
# Set up a falling edge detect to callback clear
GPIO.add_event_detect(RoSPin, GPIO.FALLING, callback=clear)
# Set up a counter as a global variable
counter = 0
Last_RoB_Status = 0
Current_RoB_Status = 0
# Define a function to deal with rotary encoder
def rotaryDeal():
global counter
global Last_RoB_Status, Current_RoB_Status
flag = 0
Last_RoB_Status = GPIO.input(RoBPin)
# When RoAPin level changes
while(not GPIO.input(RoAPin)):
Current_RoB_Status = GPIO.input(RoBPin)
flag = 1
if flag == 1:
# Reset flag
flag = 0
if (Last_RoB_Status == 0) and (Current_RoB_Status == 1):
counter = counter + 1
# time.sleep(0.5)
device.emit_combo([
# uinput.KEY_LEFTALT,
# uinput.KEY_LEFTALT,
uinput.KEY_TAB,
])
if (Last_RoB_Status == 1) and (Current_RoB_Status == 0):
device.emit_combo([
uinput.KEY_SPACE,
# uinput.KEY_TAB,
])
counter = counter - 1
print ("counter = %d" % counter)
# Define a callback function on switch, to clean "counter"
def clear(ev=None):
global counter
counter = 0
def main():
print_message()
while True:
rotaryDeal()
def destroy():
# Release resource
GPIO.cleanup()
# If run this script directly, do:
if __name__ == '__main__':
setup()
try:
main()
# When 'Ctrl+C' is pressed, the child program
# destroy() will be executed.
except KeyboardInterrupt:
destroy()
实现TAB/SHIFT+TAB键的前进后退
import RPi.GPIO as GPIO
import time
from sys import version_info
import uinput
device = uinput.Device([
    uinput.KEY_LEFTSHIFT,
    uinput.KEY_TAB,
    uinput.KEY_SPACE,
    uinput.KEY_LEFTALT
    ])

if version_info.major == 3:
    raw_input = input

# Set up pins
# Rotary A Pin
RoAPin = 17
# Rotary B Pin
RoBPin = 18
# Rotary Switch Pin
RoSPin = 27

def print_message():
    print ("========================================")
    print ("|            Rotary Encoder            |")
    print ("|    ------------------------------    |")
    print ("|        Pin A connect to GPIO17       |")
    print ("|        Pin B connect to GPIO18       |")
    print ("|     Button Pin connect to GPIO27     |")
    print ("|                                      |")
    print ("|         Use a Rotary Encoder         |")
    print ("|     Rotary to add/minus counter      |")
    print ("|      Press to set counter to 0       |")
    print ("|                                      |")
    print ("|                            SunFounder|")
    print ("========================================\n")
    print ("Program is running...")
    print ("Please press Ctrl+C to end the program...")
    #raw_input ("Press Enter to begin\n")

def setup():
    global counter
    global Last_RoB_Status, Current_RoB_Status
    GPIO.setmode(GPIO.BCM)
    GPIO.setup(RoAPin, GPIO.IN)
    GPIO.setup(RoBPin, GPIO.IN)
    GPIO.setup(RoSPin,GPIO.IN, pull_up_down=GPIO.PUD_UP)
    # Set up a falling edge detect to callback clear
    GPIO.add_event_detect(RoSPin, GPIO.FALLING, callback=clear)

    # Set up a counter as a global variable
    counter = 0
    Last_RoB_Status = 0
    Current_RoB_Status = 0

# Define a function to deal with rotary encoder
def rotaryDeal():
    global counter
    global Last_RoB_Status, Current_RoB_Status

    flag = 0
    Last_RoB_Status = GPIO.input(RoBPin)
    # When RoAPin level changes
    while(not GPIO.input(RoAPin)):
        Current_RoB_Status = GPIO.input(RoBPin)
        flag = 1
    if flag == 1:
        # Reset flag
        flag = 0
        if (Last_RoB_Status == 0) and (Current_RoB_Status == 1):
            counter = counter + 1
#            time.sleep(0.5)
            device.emit_combo([
            #    uinput.KEY_LEFTALT,
#                uinput.KEY_LEFTALT,
                uinput.KEY_TAB,
                ])
        if (Last_RoB_Status == 1) and (Current_RoB_Status == 0):
            device.emit_combo([
                uinput.KEY_LEFTSHIFT,
                uinput.KEY_TAB,
                ])
            counter = counter - 1
#        print ("counter = %d" % counter)

# Define a callback function on switch, to clean "counter"
def clear(ev=None):
    global counter
    counter = 0

def main():
    print_message()
    while True:
        rotaryDeal()

def destroy():
    # Release resource
    GPIO.cleanup()

# If run this script directly, do:
if __name__ == '__main__':
    setup()
    try:
        main()
    # When 'Ctrl+C' is pressed, the child program
    # destroy() will be  executed.
    except KeyboardInterrupt:
        destroy()
#!/usr/bin/env python
import RPi.GPIO as GPIO
import uinput
device = uinput.Device([
    uinput.KEY_LEFTSHIFT,
    uinput.KEY_TAB,
    uinput.KEY_SPACE
    ])

RoAPin = 17    # CLK Pin
RoBPin = 18    # DT Pin
BtnPin = 27    # Button Pin

globalCounter = 0

flag = 0
Last_RoB_Status = 0
Current_RoB_Status = 0

def setup():
    GPIO.setmode(GPIO.BCM)       # Numbers GPIOs by physical location
    GPIO.setup(RoAPin, GPIO.IN)    # input mode
    GPIO.setup(RoBPin, GPIO.IN)
    GPIO.setup(BtnPin, GPIO.IN, pull_up_down=GPIO.PUD_UP)

def rotaryDeal():
    global flag
    global Last_RoB_Status
    global Current_RoB_Status
    global globalCounter
    Last_RoB_Status = GPIO.input(RoBPin)
    while(not GPIO.input(RoAPin)):      #未旋转时,GPIO.input(RoAPin)值为1,旋转时会变为0
        Current_RoB_Status = GPIO.input(RoBPin)  #旋转时的当前值
        flag = 1
    if flag == 1:
        flag = 0
        if (Last_RoB_Status == 1) and (Current_RoB_Status == 0):
            globalCounter = globalCounter + 1  #顺时针旋转,角位移增大
            device.emit_combo([uinput.KEY_LEFTSHIFT,uinput.KEY_TAB,])
        if (Last_RoB_Status == 0) and (Current_RoB_Status == 1):
            globalCounter = globalCounter - 1  #逆时针旋转,数值减小
            device.emit_combo([uinput.KEY_TAB,])

def btnISR(channel):
    global globalCounter
    globalCounter = 0
    device.emit_combo([uinput.KEY_SPACE,])

def loop():
    global globalCounter
    tmp = 0 # Rotary Temperary
    GPIO.add_event_detect(BtnPin, GPIO.FALLING, callback=btnISR)
    #当按下按钮时,调用回调函数btnISR
    while True:
        rotaryDeal()
        if tmp != globalCounter:
            print('globalCounter = %d' % globalCounter)
            tmp = globalCounter

def destroy():
    GPIO.cleanup()             # Release resource

if __name__ == '__main__':     # Program start from here
    setup()
    try:
        loop()
    except KeyboardInterrupt:  # When 'Ctrl+C' is pressed, the child program destroy() will be  executed.
        destroy()
sudo nano /etc/rc.local
# rc.local
#
# This script is executed at the end of each multiuser runlevel.
# Make sure that the script will "exit 0" on success or any other
# value on error.
#
# In order to enable or disable this script just change the execution
# bits.
#
# By default this script does nothing.

# Print the IP address
_IP=$(hostname -I) || true
if [ "$_IP" ]; then
  printf "My IP address is %s\n" "$_IP"
fi
sudo modprobe uinput
sudo /usr/bin/python3 /home/jack/Downloads/r_gpio_ok_over.py &
exit 0
旋转编码器定稿程序(含正反旋转、空格按键),开机启动参见上篇
#!/usr/bin/env python
import RPi.GPIO as GPIO
import uinput
device = uinput.Device([
    uinput.KEY_LEFTSHIFT,
    uinput.KEY_TAB,
    uinput.KEY_SPACE
    ])

RoAPin = 17    # CLK Pin
RoBPin = 18    # DT Pin
BtnPin = 27    # Button Pin

globalCounter = 0
flag = 0
BtnFlag = 0
Last_RoB_Status = 0
Current_RoB_Status = 0
Current_Btn_Status = 0

def setup():
    GPIO.setmode(GPIO.BCM)       # Numbers GPIOs by physical location
    GPIO.setup(RoAPin, GPIO.IN)    # input mode
    GPIO.setup(RoBPin, GPIO.IN)
    GPIO.setup(BtnPin, GPIO.IN, pull_up_down=GPIO.PUD_UP)

def rotaryDeal():
    global flag
    global Last_RoB_Status
    global Current_RoB_Status
    global globalCounter
    global BtnFlag
    global Current_Btn_Status
    Last_RoB_Status = GPIO.input(RoBPin)
    while(not GPIO.input(RoAPin)):      #未旋转时,GPIO.input(RoAPin)值为1,旋转时会变为0
        Current_RoB_Status = GPIO.input(RoBPin)  #旋转时的当前值
        flag = 1
    if flag == 1:
        flag = 0
        if (Last_RoB_Status == 1) and (Current_RoB_Status == 0):
            globalCounter = globalCounter + 1  #顺时针旋转,角位移增大
            device.emit_combo([uinput.KEY_LEFTSHIFT,uinput.KEY_TAB,])
        if (Last_RoB_Status == 0) and (Current_RoB_Status == 1):
            globalCounter = globalCounter - 1  #逆时针旋转,数值减小
            device.emit_combo([uinput.KEY_TAB,])
    while(not GPIO.input(BtnPin)):      #未按下按钮时,GPIO.input(BtnPin)值为1,按下时会变为0
        Current_Btn_Status = GPIO.input(BtnPin)  #按下按钮时的当前值
        BtnFlag = 1
    if BtnFlag == 1:
        BtnFlag = 0
        device.emit_combo([uinput.KEY_SPACE])

def btnISR(channel):
    global globalCounter
    globalCounter = 0

def loop():
    global globalCounter
    tmp = 0 # Rotary Temperary
    GPIO.add_event_detect(BtnPin, GPIO.FALLING, callback=btnISR)
    #当按下按钮时,调用回调函数btnISR
    while True:
        rotaryDeal()
        if tmp != globalCounter:
            print('globalCounter = %d' % globalCounter)
            tmp = globalCounter

def destroy():
    GPIO.cleanup()             # Release resource

if __name__ == '__main__':     # Program start from here
    setup()
    try:
        loop()
    except KeyboardInterrupt:  # When 'Ctrl+C' is pressed, the child program destroy() will be  executed.
        destroy()