安装mosquitto
sudo apt-get update
sudo apt-get -y upgrade
sudo apt-get -y full-upgrade
sudo apt-get -y install mosquitto mosquitto-clients
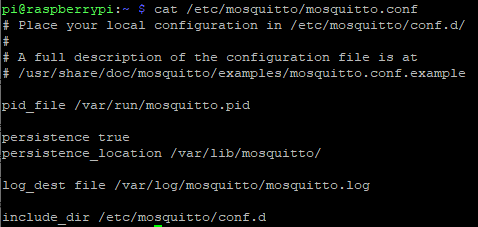
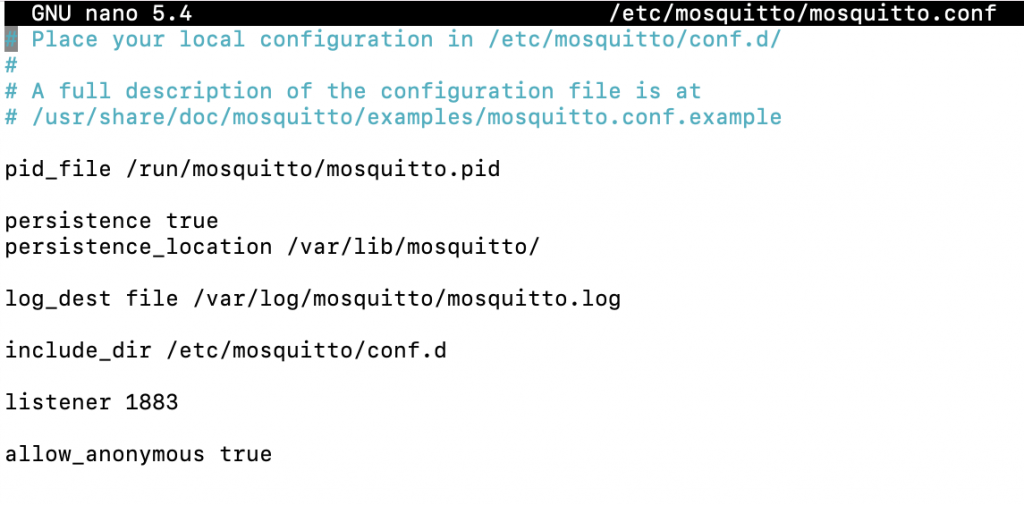
修改配置文件
sudo nano /etc/mosquitto/mosquitto.conf
Start the systemd service.
systemctl start mosquitto
Enable the systemd service to run on boot.
systemctl enable mosquitto安装python库
pip3 install paho-mqtt
sudo nano a.py
import paho.mqtt.client as mqtt
client=mqtt.Client("RPi2")
client.connect("192.168.1.8",port=1883,keepalive=60)
client.publish("mqtt/mypi","Off")
参数说明
# =================================================================
# General configuration
# =================================================================

# 客户端心跳的间隔时间
#retry_interval 20

# 系统状态的刷新时间
#sys_interval 10

# 系统资源的回收时间,0表示尽快处理
#store_clean_interval 10

# 服务进程的PID
#pid_file /var/run/mosquitto.pid

# 服务进程的系统用户
#user mosquitto

# 客户端心跳消息的最大并发数
#max_inflight_messages 10

# 客户端心跳消息缓存队列
#max_queued_messages 100

# 用于设置客户端长连接的过期时间,默认永不过期
#persistent_client_expiration

# =================================================================
# Default listener
# =================================================================

# 服务绑定的IP地址
#bind_address

# 服务绑定的端口号
#port 1883

# 允许的最大连接数,-1表示没有限制
#max_connections -1

# cafile:CA证书文件
# capath:CA证书目录
# certfile:PEM证书文件
# keyfile:PEM密钥文件
#cafile
#capath
#certfile
#keyfile

# 必须提供证书以保证数据安全性
#require_certificate false

# 若require_certificate值为true,use_identity_as_username也必须为true
#use_identity_as_username false

# 启用PSK(Pre-shared-key)支持
#psk_hint

# SSL/TSL加密算法,可以使用“openssl ciphers”命令获取
# as the output of that command.
#ciphers

# =================================================================
# Persistence
# =================================================================

# 消息自动保存的间隔时间
#autosave_interval 1800

# 消息自动保存功能的开关
#autosave_on_changes false

# 持久化功能的开关
persistence true

# 持久化DB文件
#persistence_file mosquitto.db

# 持久化DB文件目录
#persistence_location /var/lib/mosquitto/

# =================================================================
# Logging
# =================================================================

# 4种日志模式:stdout、stderr、syslog、topic
# none 则表示不记日志,此配置可以提升些许性能
log_dest none

# 选择日志的级别(可设置多项)
#log_type error
#log_type warning
#log_type notice
#log_type information

# 是否记录客户端连接信息
#connection_messages true

# 是否记录日志时间
#log_timestamp true

# =================================================================
# Security
# =================================================================

# 客户端ID的前缀限制,可用于保证安全性
#clientid_prefixes

# 允许匿名用户
#allow_anonymous true

# 用户/密码文件,默认格式:username:password
#password_file

# PSK格式密码文件,默认格式:identity:key
#psk_file

# pattern write sensor/%u/data
# ACL权限配置,常用语法如下:
# 用户限制:user <username>
# 话题限制:topic [read|write] <topic>
# 正则限制:pattern write sensor/%u/data
#acl_file

# =================================================================
# Bridges
# =================================================================

# 允许服务之间使用“桥接”模式(可用于分布式部署)
#connection <name>
#address <host>[:<port>]
#topic <topic> [[[out | in | both] qos-level] local-prefix remote-prefix]

# 设置桥接的客户端ID
#clientid

# 桥接断开时,是否清除远程服务器中的消息
#cleansession false

# 是否发布桥接的状态信息
#notifications true

# 设置桥接模式下,消息将会发布到的话题地址
# $SYS/broker/connection/<clientid>/state
#notification_topic

# 设置桥接的keepalive数值
#keepalive_interval 60

# 桥接模式,目前有三种:automatic、lazy、once
#start_type automatic

# 桥接模式automatic的超时时间
#restart_timeout 30

# 桥接模式lazy的超时时间
#idle_timeout 60

# 桥接客户端的用户名
#username

# 桥接客户端的密码
#password

# bridge_cafile:桥接客户端的CA证书文件
# bridge_capath:桥接客户端的CA证书目录
# bridge_certfile:桥接客户端的PEM证书文件
# bridge_keyfile:桥接客户端的PEM密钥文件
#bridge_cafile
#bridge_capath
#bridge_certfile
#bridge_keyfile
收发案例
树莓派(收)
import sys
import os
import time
import paho.mqtt.client as mqtt

sys.path.append(os.path.abspath(os.path.dirname(__file__) + '/' + '..'))
sys.path.append("..")

REPORT_TOPIC = 'mqtt/mypi'  # 主题


def on_connect(client, userdata, flags, rc):
    print('connected to mqtt with resurt code ', rc)
    client.subscribe(REPORT_TOPIC)  # 订阅主题


def on_message(client, userdata, msg):

    message = msg.payload.decode()
    print(message)

def server_conenet(client):
    client.on_connect = on_connect  # 启用订阅模式
    client.on_message = on_message  # 接收消息
    client.connect("1.tcp.vip.cpolar.cn", 20257, 60)  # 链接
    # client.loop_start()   # 以start方式运行,需要启动一个守护线程,让服务端运行,否则会随主线程死亡
    client.loop_forever()  # 以forever方式阻塞运行。


def server_stop(client):
    client.loop_stop()  # 停止服务端
    sys.exit(0)


def server_main():
    client_id = time.strftime('%Y%m%d%H%M%S', time.localtime(time.time()))
    client = mqtt.Client(client_id, transport='tcp')
    server_conenet(client)


if __name__ == '__main__':
    # 启动监听
    server_main()
树莓派(发)
import paho.mqtt.client as mqtt

client = mqtt.Client()
# 参数有 Client(client_id="", clean_session=True, userdata=None, protocol=MQTTv311, transport="tcp")
client.connect("1.tcp.vip.cpolar.cn", 20257, 60)  # 连接服务器,端口为1883,维持心跳为60秒
client.publish('mqtt/mypi', 'test string',1)
esp32使用mqtt
import upip
upip.install('micropython-umqtt.simple')
esp32(发)
from umqtt.simple import MQTTClient
import time

SERVER = '1.tcp.vip.cpolar.cn'
CLIENT_ID = 'PYESPCAR_A0' # 客户端的ID
TOPIC = b'mqtt/mypi' # TOPIC的ID

client = MQTTClient(CLIENT_ID,SERVER,user=None,port=20257,keepalive=60)
client.connect()


while True:
    client.publish(TOPIC, 'helloworld')
    time.sleep(1)
参考
https://mpython.readthedocs.io/en/master/library/mPython/umqtt.simple.html
from umqtt.simple import MQTTClient
import time

SERVER = '1.tcp.vip.cpolar.cn'
CLIENT_ID = 'PYESPCAR_A0' # 客户端的ID
TOPIC = b'mqtt/mypi' # TOPIC的ID

client = MQTTClient(CLIENT_ID,SERVER,user=None,port=20257,keepalive=60)
client.connect()


while True:
#    client.publish(TOPIC, b'你好')
    client.publish(TOPIC,str(time.localtime()))
    time.sleep(1)
收(命令行测试)
mosquitto_sub -h 1.tcp.vip.cpolar.cn -p 20257 -t "mqtt/mypi"esp32(收/发)
import network
import time
station = network.WLAN(network.STA_IF)
station.active(True)
station.connect("1210", "onlychina")
station.isconnected()

time.sleep(5)


#import dht11
from umqtt.simple import MQTTClient
from machine import Pin

led = Pin(4,Pin.OUT)#led引脚输出模式
client_id='PYESPCAR_A0' #设备的ID
server = '1.tcp.vip.cpolar.cn' #onenet地址
port =20257 #连接的端口
# Publish test messages e.g. with:
# mosquitto_pub -t foo_topic -m hello

# Received messages from subscriptions will be delivered to this callback
c = MQTTClient(client_id, server,port,keepalive=60) #(self, client_id, server, port=0, user=None, password=None, keepalive=0,ssl=False, ssl_params={}):
def sub_cb(topic, msg):
    print((topic, msg))
    msg_str = msg.decode()#消息转换为二进制转换字符串
    if(msg_str == "TurnOn"):
        led.value(1)
        topic_str = topic.decode() #二进制转换字符串,转换"request","response"变成消息
        #b'$sys/449990/pc_esp32/cmd/request/90651f67-14fc-431c-97b7-6321911728ed'
        #b'$sys/449990/pc_esp32/cmd/response/90651f67-14fc-431c-97b7-6321911728ed'
        topic = topic_str.replace("request","response").encode()
        if(led.value()):c.publish(topic,b"light is turn on")
    if(msg_str == "TurnOff"):
        led.value(0)
        topic_str = topic.decode() #二进制转换字符串,转换"request","response"变成消息
        topic = topic_str.replace("request","response").encode()
        if(led.value() == 0):c.publish(topic,b"light is turn off")


def main():   # test server : iot.eclipse.org
    c.set_callback(sub_cb)
    c.connect()
    c.subscribe(b'mqtt/mypi')# subscribe foo_topic tipic
    while True:
        try:#防止dht11读取错误异常退出(leb灯打开后会有超时情况:File "dht.py", line 17, in measure   -->>   OSError: [Errno 116] ETIMEDOUT)
#            _,temperature,Humidity = dht11.dht11(15)#传入引脚号
            #print(temperature,Humidity)
            c.publish(b'mqtt/mypi', "{ 'id': 123,  'dp': { 'temperatrue': 22,'humidity': [{ 'v':" + str(33) +", }]}}")#发送数据
        except OSError:
            print(OSError)
        # Non-blocking wait for message
        c.check_msg()
        # Then need to sleep to avoid 100% CPU usage (in a real
        # app other useful actions would be performed instead)
        time.sleep(6)

    c.disconnect()

if __name__ == "__main__":
    main()
参考链接
https://www.bilibili.com/read/cv12453670
#coding:utf-8
import network
import time
station = network.WLAN(network.STA_IF)
station.active(True)
station.connect("1210", "onlychina")
station.isconnected()

time.sleep(5)


#import dht11
from umqtt.simple import MQTTClient
from machine import Pin

led = Pin(4,Pin.OUT)#led引脚输出模式
client_id='PYESPCAR_A0' #设备的ID
server = '1.tcp.vip.cpolar.cn' #onenet地址
port =20257 #连接的端口
# Publish test messages e.g. with:
# mosquitto_pub -t foo_topic -m hello

# Received messages from subscriptions will be delivered to this callback
c = MQTTClient(client_id, server,port,keepalive=60) #(self, client_id, server, port=0, user=None, password=None, keepalive=0,ssl=False, ssl_params={}):
def sub_cb(topic, msg):
    print((topic, msg))
    msg_str = msg.decode()#消息转换为二进制转换字符串
    if(msg_str == "TurnOn"):
        led.value(1)
        topic_str = topic.decode() #二进制转换字符串,转换"request","response"变成消息
        #b'$sys/449990/pc_esp32/cmd/request/90651f67-14fc-431c-97b7-6321911728ed'
        #b'$sys/449990/pc_esp32/cmd/response/90651f67-14fc-431c-97b7-6321911728ed'
        topic = topic_str.replace("request","response").encode()
        if(led.value()):c.publish(topic,b"开灯")
    if(msg_str == "TurnOff"):
        led.value(0)
        topic_str = topic.decode() #二进制转换字符串,转换"request","response"变成消息
        topic = topic_str.replace("request","response").encode()
        if(led.value() == 0):c.publish(topic,b"关灯")


def main():   # test server : iot.eclipse.org
    c.set_callback(sub_cb)
    c.connect()
    c.subscribe(b'mqtt/mypi')# subscribe foo_topic tipic
    while True:
        try:#防止dht11读取错误异常退出(leb灯打开后会有超时情况:File "dht.py", line 17, in measure   -->>   OSError: [Errno 116] ETIMEDOUT)
#            _,temperature,Humidity = dht11.dht11(15)#传入引脚号
            #print(temperature,Humidity)
            c.publish(b'mqtt/mypi','TurnOff')#发送数据
        except OSError:
            print(OSError)
        # Non-blocking wait for message
        c.check_msg()
        # Then need to sleep to avoid 100% CPU usage (in a real
        # app other useful actions would be performed instead)
        time.sleep(6)

    c.disconnect()

if __name__ == "__main__":
    main()
带断线重连功能的mqtt(umqttsimple.py)
try:
    import usocket as socket
except:
    import socket
import ustruct as struct
from ubinascii import hexlify

class MQTTException(Exception):
    pass

class MQTTClient:

    def __init__(self, client_id, server, port=0, user=None, password=None, keepalive=0,
                 ssl=False, ssl_params={}):
        if port == 0:
            port = 8883 if ssl else 1883
        self.client_id = client_id
        self.sock = None
        self.server = server
        self.port = port
        self.ssl = ssl
        self.ssl_params = ssl_params
        self.pid = 0
        self.cb = None
        self.user = user
        self.pswd = password
        self.keepalive = keepalive
        self.lw_topic = None
        self.lw_msg = None
        self.lw_qos = 0
        self.lw_retain = False

    def _send_str(self, s):
        self.sock.write(struct.pack("!H", len(s)))
        self.sock.write(s)

    def _recv_len(self):
        n = 0
        sh = 0
        while 1:
            b = self.sock.read(1)[0]
            n |= (b & 0x7f) << sh
            if not b & 0x80:
                return n
            sh += 7

    def set_callback(self, f):
        self.cb = f

    def set_last_will(self, topic, msg, retain=False, qos=0):
        assert 0 <= qos <= 2
        assert topic
        self.lw_topic = topic
        self.lw_msg = msg
        self.lw_qos = qos
        self.lw_retain = retain

    def connect(self, clean_session=True):
        self.sock = socket.socket()
        addr = socket.getaddrinfo(self.server, self.port)[0][-1]
        self.sock.connect(addr)
        if self.ssl:
            import ussl
            self.sock = ussl.wrap_socket(self.sock, **self.ssl_params)
        premsg = bytearray(b"\x10\0\0\0\0\0")
        msg = bytearray(b"\x04MQTT\x04\x02\0\0")

        sz = 10 + 2 + len(self.client_id)
        msg[6] = clean_session << 1
        if self.user is not None:
            sz += 2 + len(self.user) + 2 + len(self.pswd)
            msg[6] |= 0xC0
        if self.keepalive:
            assert self.keepalive < 65536
            msg[7] |= self.keepalive >> 8
            msg[8] |= self.keepalive & 0x00FF
        if self.lw_topic:
            sz += 2 + len(self.lw_topic) + 2 + len(self.lw_msg)
            msg[6] |= 0x4 | (self.lw_qos & 0x1) << 3 | (self.lw_qos & 0x2) << 3
            msg[6] |= self.lw_retain << 5

        i = 1
        while sz > 0x7f:
            premsg[i] = (sz & 0x7f) | 0x80
            sz >>= 7
            i += 1
        premsg[i] = sz

        self.sock.write(premsg, i + 2)
        self.sock.write(msg)
        #print(hex(len(msg)), hexlify(msg, ":"))
        self._send_str(self.client_id)
        if self.lw_topic:
            self._send_str(self.lw_topic)
            self._send_str(self.lw_msg)
        if self.user is not None:
            self._send_str(self.user)
            self._send_str(self.pswd)
        resp = self.sock.read(4)
        assert resp[0] == 0x20 and resp[1] == 0x02
        if resp[3] != 0:
            raise MQTTException(resp[3])
        return resp[2] & 1

    def disconnect(self):
        self.sock.write(b"\xe0\0")
        self.sock.close()

    def ping(self):
        self.sock.write(b"\xc0\0")

    def publish(self, topic, msg, retain=False, qos=0):
        pkt = bytearray(b"\x30\0\0\0")
        pkt[0] |= qos << 1 | retain
        sz = 2 + len(topic) + len(msg)
        if qos > 0:
            sz += 2
        assert sz < 2097152
        i = 1
        while sz > 0x7f:
            pkt[i] = (sz & 0x7f) | 0x80
            sz >>= 7
            i += 1
        pkt[i] = sz
        #print(hex(len(pkt)), hexlify(pkt, ":"))
        self.sock.write(pkt, i + 1)
        self._send_str(topic)
        if qos > 0:
            self.pid += 1
            pid = self.pid
            struct.pack_into("!H", pkt, 0, pid)
            self.sock.write(pkt, 2)
        self.sock.write(msg)
        if qos == 1:
            while 1:
                op = self.wait_msg()
                if op == 0x40:
                    sz = self.sock.read(1)
                    assert sz == b"\x02"
                    rcv_pid = self.sock.read(2)
                    rcv_pid = rcv_pid[0] << 8 | rcv_pid[1]
                    if pid == rcv_pid:
                        return
        elif qos == 2:
            assert 0

    def subscribe(self, topic, qos=0):
        assert self.cb is not None, "Subscribe callback is not set"
        pkt = bytearray(b"\x82\0\0\0")
        self.pid += 1
        struct.pack_into("!BH", pkt, 1, 2 + 2 + len(topic) + 1, self.pid)
        #print(hex(len(pkt)), hexlify(pkt, ":"))
        self.sock.write(pkt)
        self._send_str(topic)
        self.sock.write(qos.to_bytes(1, "little"))
        while 1:
            op = self.wait_msg()
            if op == 0x90:
                resp = self.sock.read(4)
                #print(resp)
                assert resp[1] == pkt[2] and resp[2] == pkt[3]
                if resp[3] == 0x80:
                    raise MQTTException(resp[3])
                return

    # Wait for a single incoming MQTT message and process it.
    # Subscribed messages are delivered to a callback previously
    # set by .set_callback() method. Other (internal) MQTT
    # messages processed internally.
    def wait_msg(self):
        res = self.sock.read(1)
        self.sock.setblocking(True)
        if res is None:
            return None
        if res == b"":
            raise OSError(-1)
        if res == b"\xd0":  # PINGRESP
            sz = self.sock.read(1)[0]
            assert sz == 0
            return None
        op = res[0]
        if op & 0xf0 != 0x30:
            return op
        sz = self._recv_len()
        topic_len = self.sock.read(2)
        topic_len = (topic_len[0] << 8) | topic_len[1]
        topic = self.sock.read(topic_len)
        sz -= topic_len + 2
        if op & 6:
            pid = self.sock.read(2)
            pid = pid[0] << 8 | pid[1]
            sz -= 2
        msg = self.sock.read(sz)
        self.cb(topic, msg)
        if op & 6 == 2:
            pkt = bytearray(b"\x40\x02\0\0")
            struct.pack_into("!H", pkt, 2, pid)
            self.sock.write(pkt)
        elif op & 6 == 4:
            assert 0

    # Checks whether a pending message from server is available.
    # If not, returns immediately with None. Otherwise, does
    # the same processing as wait_msg.
    def check_msg(self):
        self.sock.setblocking(False)
        return self.wait_msg()
主程序(main.py)
# Complete project details at https://RandomNerdTutorials.com/micropython-mqtt-publish-ds18b10-esp32-esp8266/
import time
from umqttsimple import MQTTClient
import ubinascii
import machine
import micropython
import network
import esp
from machine import Pin
import onewire
import ds18x20
esp.osdebug(None)
import gc
gc.collect()

ssid = '1210'
password = 'onlychina'
mqtt_server = '1.tcp.vip.cpolar.cn'
#EXAMPLE IP ADDRESS
#mqtt_server = '192.168.1.106'

client_id = ubinascii.hexlify(machine.unique_id())

topic_pub_temp = b'esp/ds18b20/temperature'

last_message = 0
message_interval = 5

station = network.WLAN(network.STA_IF)

station.active(True)
station.connect(ssid, password)

while station.isconnected() == False:
  pass

print('Connection successful')

ds_pin = machine.Pin(4)
ds_sensor = ds18x20.DS18X20(onewire.OneWire(ds_pin))

def connect_mqtt():
  global client_id, mqtt_server
  client = MQTTClient(client_id, mqtt_server,port=20257,keepalive=60)
  #client = MQTTClient(client_id, mqtt_server, user=your_username, password=your_password)
  client.connect()
  print('Connected to %s MQTT broker' % (mqtt_server))
  return client

def restart_and_reconnect():
  print('Failed to connect to MQTT broker. Reconnecting...')
  time.sleep(10)
  machine.reset()

def read_sensor():
  try:
    roms = ds_sensor.scan()
    ds_sensor.convert_temp()
    time.sleep_ms(750)
    for rom in roms:
      temp = ds_sensor.read_temp(rom)
      # uncomment for Fahrenheit
      temp = temp * (9/5) + 32.0
    if (isinstance(temp, float) or (isinstance(temp, int))):
      temp = (b'{0:3.1f},'.format(temp))
      return temp
    else:
      return('Invalid sensor readings.')
  except OSError as e:
    return('Failed to read sensor.')

try:
  client = connect_mqtt()
except OSError as e:
  restart_and_reconnect()

while True:
  try:
    if (time.time() - last_message) > message_interval:
#      temp = read_sensor()  #zjg
      temp = str(time.localtime())
      print(temp)
      client.publish(topic_pub_temp, temp)
      last_message = time.time()
  except OSError as e:
    restart_and_reconnect()
同步网络时间
#coding:utf-8
# Complete project details at https://RandomNerdTutorials.com/micropython-mqtt-publish-ds18b10-esp32-esp8266/
import time,ntptime
from umqttsimple import MQTTClient
import ubinascii
import machine
import micropython
import network
import esp
from machine import Pin,RTC
import onewire
import ds18x20

rtc = RTC()

led1=Pin(12,Pin.OUT)

def set_ntptime():
  print("正在从NTP时间服务器获取时间,并校时到ESP8266/ESP32中(多次网络校时会出错OSError: -202,请断开串口连接再重试即可):")
  print("  A.网络校时前本地时间:%s" %str(time.localtime()))
  ntptime.NTP_DELTA = 3155644800    # 设置  UTC+8偏移时间(秒),不设置就是UTC0
  ntptime.host = 'ntp1.aliyun.com'  # 可选ntp服务器为阿里云服务器,默认是"pool.ntp.org"
  ntptime.settime()                 # 从NTP服务器获取时间,并写入到ESP8266/ESP32设备中,到这就已经设置好了
  print("  B.网络校时后本地时间:%s" %str(time.localtime()))


def sync_ntp():
     ntptime.NTP_DELTA = 3155644800   # 可选 UTC+8偏移时间(秒),不设置就是UTC0
     ntptime.host = 'ntp1.aliyun.com'  # 可选,ntp服务器,默认是"pool.ntp.org"
     ntptime.settime()   # 修改设备时间,到这就已经设置好了

esp.osdebug(None)
import gc
gc.collect()

ssid = '1210'
password = 'onlychina'
mqtt_server = 'mqtt.begair.com'
#EXAMPLE IP ADDRESS
#mqtt_server = '192.168.1.106'

client_id = ubinascii.hexlify(machine.unique_id())

topic_pub_temp = b'esp1'

last_message = 0
message_interval = 5

station = network.WLAN(network.STA_IF)

station.active(True)
station.connect(ssid, password)

while station.isconnected() == False:
  pass

print('Connection successful')

ds_pin = machine.Pin(4)
ds_sensor = ds18x20.DS18X20(onewire.OneWire(ds_pin))

def connect_mqtt():
  global client_id, mqtt_server
  client = MQTTClient(client_id, mqtt_server,port=20257,keepalive=60)
  #client = MQTTClient(client_id, mqtt_server, user=your_username, password=your_password)
  client.connect()
  print('Connected to %s MQTT broker' % (mqtt_server))
  return client

def restart_and_reconnect():
  print('Failed to connect to MQTT broker. Reconnecting...')
  time.sleep(10)
  machine.reset()

def read_sensor():
  try:
    roms = ds_sensor.scan()
    ds_sensor.convert_temp()
    time.sleep_ms(750)
    for rom in roms:
      temp = ds_sensor.read_temp(rom)
      # uncomment for Fahrenheit
      temp = temp * (9/5) + 32.0
    if (isinstance(temp, float) or (isinstance(temp, int))):
      temp = (b'{0:3.1f},'.format(temp))
      return temp
    else:
      return('Invalid sensor readings.')
  except OSError as e:
    return('Failed to read sensor.')

# 同步时间
def sync_ntp():
     ntptime.NTP_DELTA = 3155644800   # 可选 UTC+8偏移时间(秒),不设置就是UTC0
     ntptime.host = 'ntp1.aliyun.com'  # 可选,ntp服务器,默认是"pool.ntp.org"
     try:
         ntptime.settime()   # 修改设备时间,到这就已经设置好了
     except:
         for i in range(6):
            led1.value(1)              #turn off 0是亮
            time.sleep(0.1)
            led1.value(0)
            time.sleep(0.1)
         print('同步失败')


try:
  client = connect_mqtt()
except OSError as e:
  restart_and_reconnect()

while True:
    for i in range(5):
        sync_ntp()
        time.sleep(1)
    while True:
        dt=time.localtime()
        try:
            if (time.time() - last_message) > message_interval:
    #      temp = read_sensor()  #zjg
                temp = str(dt)
                print(temp)
                client.publish(topic_pub_temp, b'真可以了')
                client.publish(topic_pub_temp, temp)
                last_message = time.time()
        except OSError as e:
            restart_and_reconnect()
带有账号权限的收发
#coding:utf-8
# Complete project details at https://RandomNerdTutorials.com/micropython-mqtt-publish-ds18b10-esp32-esp8266/
import time,ntptime
from umqttsimple import MQTTClient
import ubinascii
import machine
import micropython
import network
import esp
from machine import Pin,RTC
import onewire
import ds18x20

rtc = RTC()

led1=Pin(12,Pin.OUT)

def set_ntptime():
  print("正在从NTP时间服务器获取时间,并校时到ESP8266/ESP32中(多次网络校时会出错OSError: -202,请断开串口连接再重试即可):")
  print("  A.网络校时前本地时间:%s" %str(time.localtime()))
  ntptime.NTP_DELTA = 3155644800    # 设置  UTC+8偏移时间(秒),不设置就是UTC0
  ntptime.host = 'ntp1.aliyun.com'  # 可选ntp服务器为阿里云服务器,默认是"pool.ntp.org"
  ntptime.settime()                 # 从NTP服务器获取时间,并写入到ESP8266/ESP32设备中,到这就已经设置好了
  print("  B.网络校时后本地时间:%s" %str(time.localtime()))


esp.osdebug(None)
import gc
gc.collect()

ssid = '1210'
password = 'onlychina'
mqtt_server = 'mqtt.begair.com'
#EXAMPLE IP ADDRESS
#mqtt_server = '192.168.1.106'

client_id = ubinascii.hexlify(machine.unique_id())

topic_pub_temp = b'begair'

last_message = 0
message_interval = 5

station = network.WLAN(network.STA_IF)

station.active(True)
station.connect(ssid, password)

while station.isconnected() == False:
  pass

print('Connection successful')

ds_pin = machine.Pin(4)
ds_sensor = ds18x20.DS18X20(onewire.OneWire(ds_pin))

def connect_mqtt():
  global client_id, mqtt_server
  client = MQTTClient(client_id, mqtt_server,port=20257,user='getair',password='raspberry',keepalive=60)
  #client = MQTTClient(client_id, mqtt_server, user=your_username, password=your_password)
  client.connect()
  print('Connected to %s MQTT broker' % (mqtt_server))
  return client

def restart_and_reconnect():
  print('Failed to connect to MQTT broker. Reconnecting...')
  time.sleep(10)
  machine.reset()

def read_sensor():
  try:
    roms = ds_sensor.scan()
    ds_sensor.convert_temp()
    time.sleep_ms(750)
    for rom in roms:
      temp = ds_sensor.read_temp(rom)
      # uncomment for Fahrenheit
      temp = temp * (9/5) + 32.0
    if (isinstance(temp, float) or (isinstance(temp, int))):
      temp = (b'{0:3.1f},'.format(temp))
      return temp
    else:
      return('Invalid sensor readings.')
  except OSError as e:
    return('Failed to read sensor.')

# 同步时间
def sync_ntp():
     ntptime.NTP_DELTA = 3155644800   # 可选 UTC+8偏移时间(秒),不设置就是UTC0
     ntptime.host = 'ntp1.aliyun.com'  # 可选,ntp服务器,默认是"pool.ntp.org"
     try:
         ntptime.settime()   # 修改设备时间,到这就已经设置好了
     except:
         for i in range(6):
            led1.value(1)              #turn off 0是亮
            time.sleep(0.1)
            led1.value(0)
            time.sleep(0.1)
         print('同步失败')


try:
  client = connect_mqtt()
except OSError as e:
  restart_and_reconnect()

while True:
    for i in range(5):
        sync_ntp()
        time.sleep(1)
    while True:
        dt=time.localtime()
        try:
            if (time.time() - last_message) > message_interval:
    #      temp = read_sensor()  #zjg
                temp = str(dt)
                print(temp)
                client.publish(topic_pub_temp, b'真可以了')
                client.publish(topic_pub_temp, temp)
                last_message = time.time()
        except OSError as e:
            restart_and_reconnect()
MQTT参考
https://zhuanlan.zhihu.com/p/383708520
读取Pin脚状态并发送
#coding:utf-8
# Complete project details at https://RandomNerdTutorials.com/micropython-mqtt-publish-ds18b10-esp32-esp8266/
import time,ntptime
from umqttsimple import MQTTClient
import ubinascii
import machine
import micropython
import network
import esp
from machine import Pin,RTC
import onewire
import ds18x20

rtc = RTC()


led = machine.Pin(13,machine.Pin.OUT)  #定义led为输出
sw = machine.Pin(0,machine.Pin.IN)    #定义sw为输入


led1=Pin(12,Pin.OUT)

def set_ntptime():
  print("正在从NTP时间服务器获取时间,并校时到ESP8266/ESP32中(多次网络校时会出错OSError: -202,请断开串口连接再重试即可):")
  print("  A.网络校时前本地时间:%s" %str(time.localtime()))
  ntptime.NTP_DELTA = 3155644800    # 设置  UTC+8偏移时间(秒),不设置就是UTC0
  ntptime.host = 'ntp1.aliyun.com'  # 可选ntp服务器为阿里云服务器,默认是"pool.ntp.org"
  ntptime.settime()                 # 从NTP服务器获取时间,并写入到ESP8266/ESP32设备中,到这就已经设置好了
  print("  B.网络校时后本地时间:%s" %str(time.localtime()))


esp.osdebug(None)
import gc
gc.collect()

ssid = '1210'
password = 'onlychina'
mqtt_server = 'mqtt.begair.com'
#EXAMPLE IP ADDRESS
#mqtt_server = '192.168.1.106'

client_id = ubinascii.hexlify(machine.unique_id())

topic_pub_temp = b'beg'

last_message = 0
message_interval = 5

station = network.WLAN(network.STA_IF)

station.active(True)
station.connect(ssid, password)

while station.isconnected() == False:
  pass

print('Connection successful')

ds_pin = machine.Pin(4)
ds_sensor = ds18x20.DS18X20(onewire.OneWire(ds_pin))

def connect_mqtt():
  global client_id, mqtt_server
  client = MQTTClient(client_id, mqtt_server,port=20257,user='getair',password='raspberry',keepalive=60)
  #client = MQTTClient(client_id, mqtt_server, user=your_username, password=your_password)
  client.connect()
  print('Connected to %s MQTT broker' % (mqtt_server))
  return client

def restart_and_reconnect():
  print('Failed to connect to MQTT broker. Reconnecting...')
  time.sleep(10)
  machine.reset()

def read_sensor():
  try:
    roms = ds_sensor.scan()
    ds_sensor.convert_temp()
    time.sleep_ms(750)
    for rom in roms:
      temp = ds_sensor.read_temp(rom)
      # uncomment for Fahrenheit
      temp = temp * (9/5) + 32.0
    if (isinstance(temp, float) or (isinstance(temp, int))):
      temp = (b'{0:3.1f},'.format(temp))
      return temp
    else:
      return('Invalid sensor readings.')
  except OSError as e:
    return('Failed to read sensor.')

# 同步时间
def sync_ntp():
     ntptime.NTP_DELTA = 3155644800   # 可选 UTC+8偏移时间(秒),不设置就是UTC0
     ntptime.host = 'ntp1.aliyun.com'  # 可选,ntp服务器,默认是"pool.ntp.org"
     try:
         ntptime.settime()   # 修改设备时间,到这就已经设置好了
     except:
         for i in range(6):
            led1.value(1)              #turn off 0是亮
            time.sleep(0.1)
            led1.value(0)
            time.sleep(0.1)
         print('同步失败')


try:
  client = connect_mqtt()
except OSError as e:
  restart_and_reconnect()

while True:
    for i in range(5):
        sync_ntp()
        time.sleep(1)
    while True:
        sw = machine.Pin(0,machine.Pin.IN)    #定义sw为输入
        dt=time.localtime()
        try:
            if (time.time() - last_message) > message_interval:
    #      temp = read_sensor()  #zjg
                temp = str(dt)
    #                print(temp)
                if (sw.value() == 1):
                    client.publish(topic_pub_temp, b'真可以了')
                    led.on()
                else:
                    client.publish(topic_pub_temp, temp)
                    led.off()
                last_message = time.time()
        except OSError as e:
            restart_and_reconnect()
自动联网的mqtt传感器
#coding:utf-8
# Complete project details at https://RandomNerdTutorials.com/micropython-mqtt-publish-ds18b10-esp32-esp8266/
import time,ntptime
from umqttsimple import MQTTClient
import ubinascii
import machine
import micropython
import network
import esp
from machine import Pin,RTC
import onewire
import ds18x20
import wifimgr


rtc = RTC()


led = machine.Pin(13,machine.Pin.OUT)  #定义led为输出
sw = machine.Pin(0,machine.Pin.IN)    #定义sw为输入


led1=Pin(12,Pin.OUT)

def set_ntptime():
  print("正在从NTP时间服务器获取时间,并校时到ESP8266/ESP32中(多次网络校时会出错OSError: -202,请断开串口连接再重试即可):")
  print("  A.网络校时前本地时间:%s" %str(time.localtime()))
  ntptime.NTP_DELTA = 3155644800    # 设置  UTC+8偏移时间(秒),不设置就是UTC0
  ntptime.host = 'ntp1.aliyun.com'  # 可选ntp服务器为阿里云服务器,默认是"pool.ntp.org"
  ntptime.settime()                 # 从NTP服务器获取时间,并写入到ESP8266/ESP32设备中,到这就已经设置好了
  print("  B.网络校时后本地时间:%s" %str(time.localtime()))


esp.osdebug(None)
import gc
gc.collect()

mqtt_server = 'mqtt.roown.com'
#EXAMPLE IP ADDRESS
#mqtt_server = '192.168.1.106'

client_id = ubinascii.hexlify(machine.unique_id())

topic_pub_temp = b'beg'

last_message = 0
message_interval = 0.002

led1.value(1)
try:
    wlan = wifimgr.get_connection()
    if wlan is None:
        print("Could not initialize the network connection.")
    led1.value(1)
    time.sleep(1)
    led1.value(0)
    print('Connection successful')
except:
    print('连接 wifi 失败')
    machine.reset()
led1.value(1)


ds_pin = machine.Pin(4)
ds_sensor = ds18x20.DS18X20(onewire.OneWire(ds_pin))

def connect_mqtt():
  global client_id, mqtt_server
  client = MQTTClient(client_id, mqtt_server,port=21892,user='roown',password='Chinaone',keepalive=60)
  #client = MQTTClient(client_id, mqtt_server, user=your_username, password=your_password)
  client.connect()
  print('Connected to %s MQTT broker' % (mqtt_server))
  return client

def restart_and_reconnect():
  print('Failed to connect to MQTT broker. Reconnecting...')
  time.sleep(10)
  machine.reset()

def read_sensor():
  try:
    roms = ds_sensor.scan()
    ds_sensor.convert_temp()
    time.sleep_ms(750)
    for rom in roms:
      temp = ds_sensor.read_temp(rom)
      # uncomment for Fahrenheit
      temp = temp * (9/5) + 32.0
    if (isinstance(temp, float) or (isinstance(temp, int))):
      temp = (b'{0:3.1f},'.format(temp))
      return temp
    else:
      return('Invalid sensor readings.')
  except OSError as e:
    return('Failed to read sensor.')

# 同步时间
def sync_ntp():
     ntptime.NTP_DELTA = 3155644800   # 可选 UTC+8偏移时间(秒),不设置就是UTC0
     ntptime.host = 'ntp1.aliyun.com'  # 可选,ntp服务器,默认是"pool.ntp.org"
     try:
         ntptime.settime()   # 修改设备时间,到这就已经设置好了
     except:
         for i in range(6):
            led1.value(1)              #turn off 0是亮
            time.sleep(0.1)
            led1.value(0)
            time.sleep(0.1)
         print('同步失败')


try:
  client = connect_mqtt()
except OSError as e:
  restart_and_reconnect()

while True:
    for i in range(5):
        sync_ntp()
        time.sleep(1)
    while True:
        sw = machine.Pin(0,machine.Pin.IN)    #定义sw为输入
        dt=time.localtime()
        ws=sw.value()
        try:
            if (time.time() - last_message) > message_interval:  #zjg
    #      temp = read_sensor()  #zjg
                temp = str(dt)
    #                print(temp)
                if (ws == 1):
                    led.on()
                    client.publish(topic_pub_temp, b'真可以了')
                else:
                    led.off()
                    client.publish(topic_pub_temp, temp)
                last_message = time.time()
        except OSError as e:
            restart_and_reconnect()